The Acoustic Guitar Forum

Go Back   The Acoustic Guitar Forum > General Acoustic Guitar and Amplification Discussion > Build and Repair

Reply
 
Thread Tools
  #31  
Old 06-11-2013, 01:39 AM
murrmac123 murrmac123 is offline
Registered User
 
Join Date: Dec 2008
Location: Edinburgh, bonny Scotland
Posts: 5,197
Default

Quote:
Originally Posted by Viking View Post
Have you got a link for the abrasive cloth you are using? I'm using aluminum oxide paper (60 grit), but it looses it's cutting edge pretty quick which is part of what made the process so long last night. Does yours last longer because you are using such a long length of it?
I have an account with Klingspor here in the UK, and buy 50 meter rolls direct from them. In the States, you would be best buying a 36 grit 4" x 24" sanding belt from the Klingspor Woodworking Shop, very helpful and pleasant people to deal with. If you cut the belt in half (at the seam) , that will give you a workable 24" length so you can use the full length of the plate.

If you search the site you will also find PSA abrasive rolls of all grits, and you can cut these into 24" lengths as well. A roll of 60, 80 and 120 should suffice.
Reply With Quote
  #32  
Old 06-11-2013, 08:19 PM
John Arnold John Arnold is offline
Registered User
 
Join Date: Jan 2009
Posts: 4,092
Default

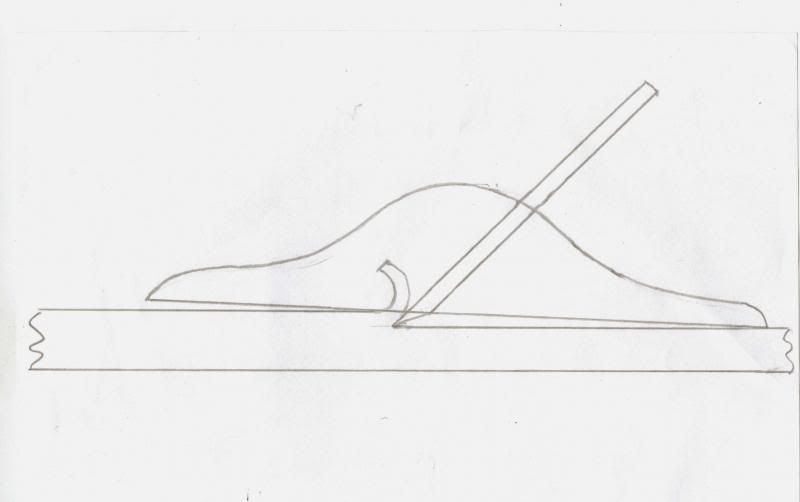
I could not find an online illustration of hand plane cutting geometry, so I just drew one. This may explain why producing a flat surface is not automatic, even when the plane bottom is perfectly flat.


In the late-1970's, I bought a rusty no name #3 Stanley copy at the flea market for 25 cents. The handles were long gone, and nothing came apart easily. I loosened the frozen adjusting nut (which was steel instead of brass) with repeated applications of penetrating oil and heat.
Because I had access to a machine shop at the time, I ground the bottom and sides on a surface grinder. I also ground both sides of the blade.
After a paint job and new homemade walnut handles, I had a plane that would cut the mustard. It is by no means the largest plane I have, since I also have a #6 Stanley and a #8 Lakeside. But this is the one I use the most for jointing soundboards.


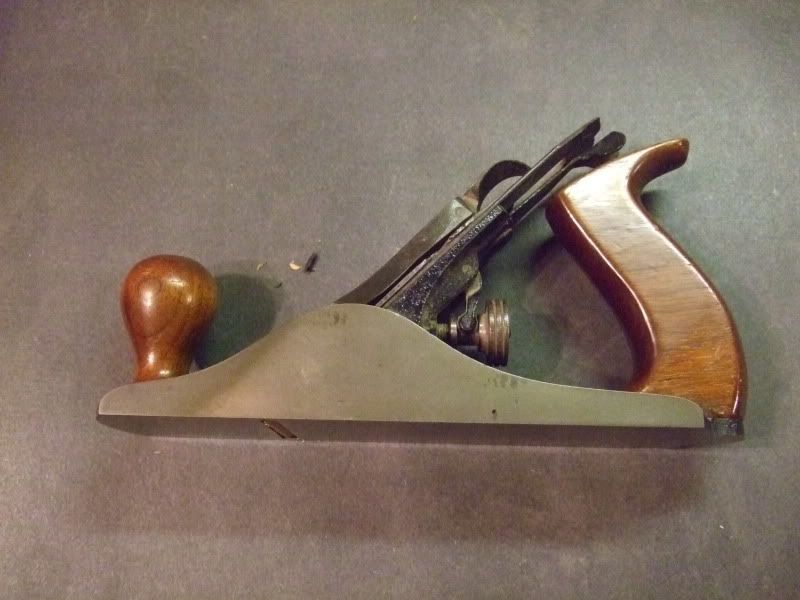
My other favorite is a Stanley #101, which was originally marketed as a toy plane. The original ones are cast iron instead of sheet metal, and the early ones are really well made.


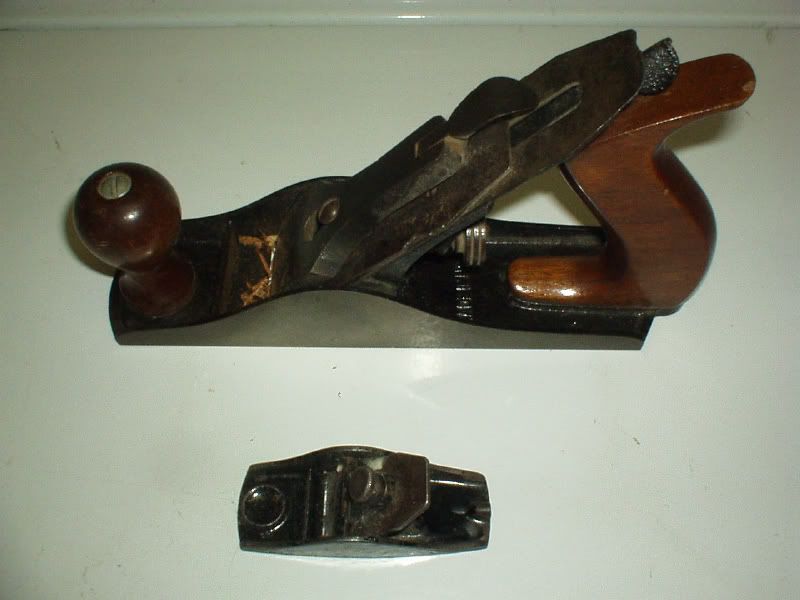
Unlike some small block planes, this one has a 45 degree blade angle, with the bevel on the bottom side of the blade. This gives it the same cutting geometry as the smooth planes.

Last edited by John Arnold; 06-11-2013 at 08:42 PM.
Reply With Quote
  #33  
Old 06-12-2013, 02:05 AM
Viking Viking is offline
Registered User
 
Join Date: Mar 2013
Location: Colorado Springs, CO
Posts: 234
Default

So I've finished lapping the sole and the down side of the plane. Here's a before shot with some permanent marker highlighting how much work had to be done on the plane. The toe and heel were the only thing touching the paper.


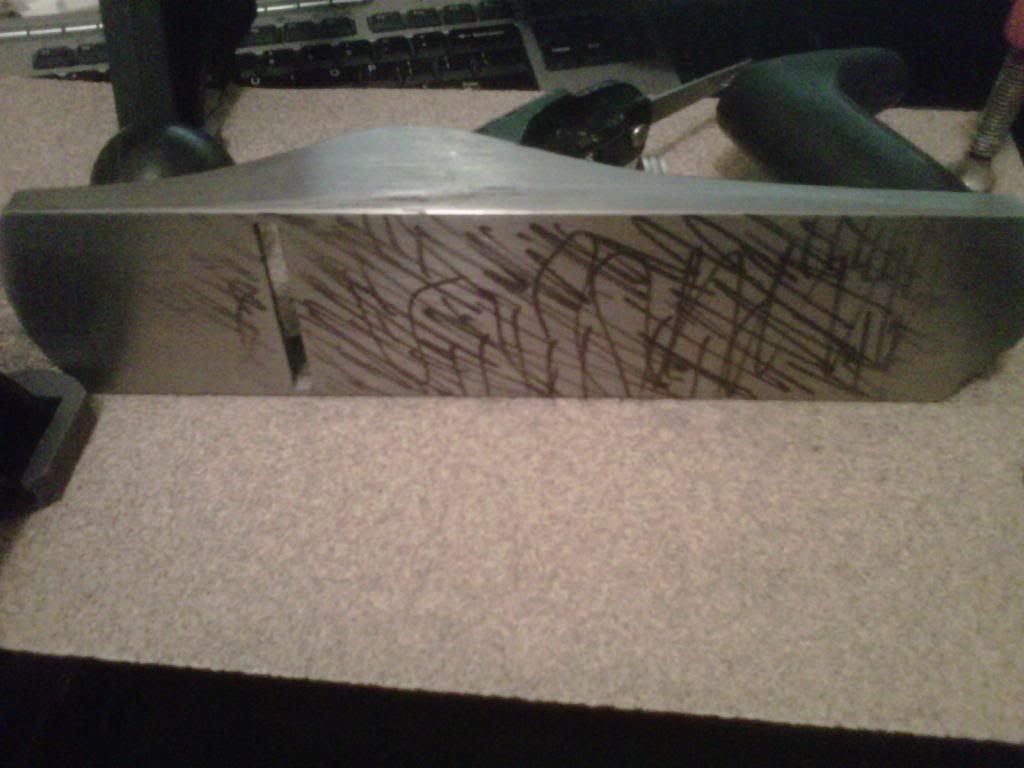
And after. This shot also shows my iron and the honing guide I made.


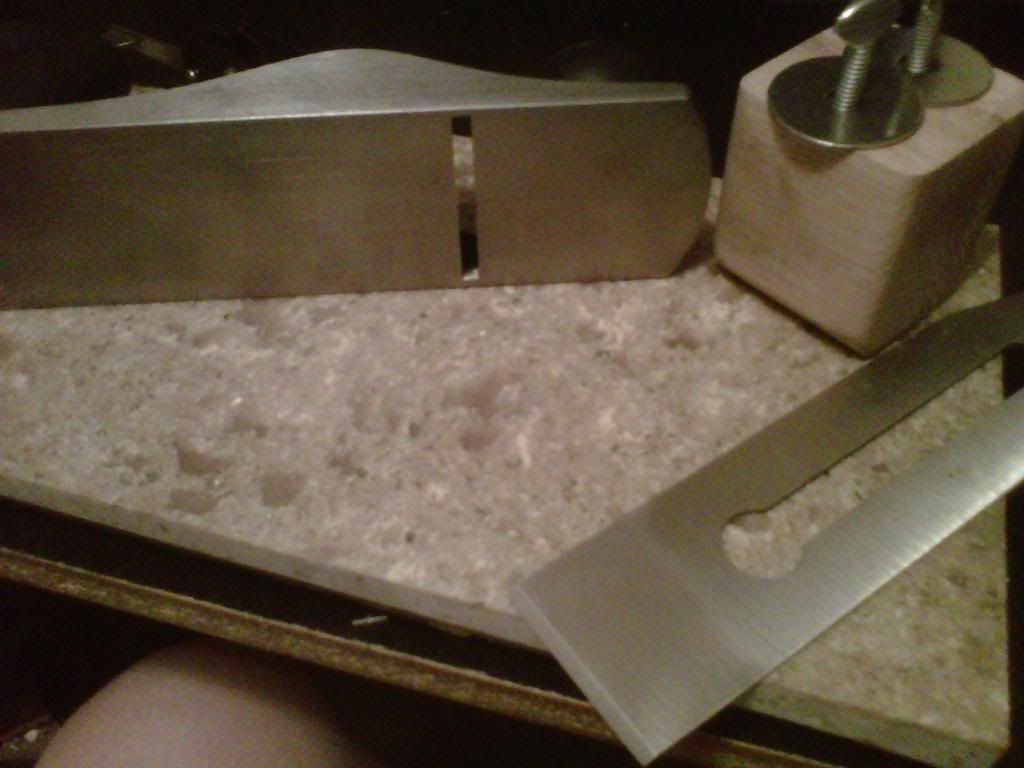
Tomorrow night I'll cut into some of the WRC boards I've got, see if I can't get a good joint.

I appreciate all the input and thoughts you guys have given me.
Reply With Quote
  #34  
Old 06-12-2013, 06:49 AM
Ned Milburn Ned Milburn is offline
Registered User
 
Join Date: Feb 2011
Location: Dartmouth, NS
Posts: 3,127
Default

Nice work Viking. Look forward to hearing your results (hopefully all positive). ;-)
__________________
----

Ned Milburn
NSDCC Master Artisan
Dartmouth, Nova Scotia
Reply With Quote
  #35  
Old 06-13-2013, 02:50 AM
murrmac123 murrmac123 is offline
Registered User
 
Join Date: Dec 2008
Location: Edinburgh, bonny Scotland
Posts: 5,197
Default

Quote:
Originally Posted by Alan Carruth View Post
I'm going to venture a small disagreement with John Arnold here: I think the geometry of the hand plane tends to make a concave surface, not a convex one. The tendency to 'snipe' at the ends is almost all technique, IMO.
I would have to venture a small disagreement with you, Alan ...the geometry of a hand plane is exactly analogous to a jointer which has the outfeed table set in the same plane as the infeed table ( as opposed to being set in line with the edge of the cutter ).

What will happen there is that the workpiece will have a perfectly flat surface machined as long as the back of the workpiece is in contact with the infeed table, and as long as the machined part of the workpiece is not making contact with the outfeed table. When the weight of the workpiece forces the machined surface to make contact with the outfeed table, then you get snipe, which effectively produces a convex surface, but never a concave surface.

By the same token, a handplane with a perfectly flat sole will never per se have a tendency to produce a concave surface, although of course a concave surface can easily be produced by technique.

Theoretically, and assuming that the function of the plane is always to produce a dead straight and flat surface, the correct geometry for a handplane would be to have the center of the rear of the sole a few thou proud of the front of the sole ( for the width of the blade ), and have the edge of the blade set exactly in line with the rear of the sole, but I don't envisage manufacturers producing such a tool any time soon...
Reply With Quote
  #36  
Old 06-13-2013, 09:10 AM
arie arie is offline
Registered User
 
Join Date: Jun 2009
Posts: 2,728
Default

Quote:
Originally Posted by murrmac123 View Post

Theoretically, and assuming that the function of the plane is always to produce a dead straight and flat surface, the correct geometry for a handplane would be to have the center of the rear of the sole a few thou proud of the front of the sole ( for the width of the blade ), and have the edge of the blade set exactly in line with the rear of the sole, but I don't envisage manufacturers producing such a tool any time soon...
what you are proposing is the reverse of this:


with pretty much the same result.


like mr arnold, i too have revived ancient planes. i had access to a surface grinder and was able to not only true up the sole, but square up the sides as well. most neglect this area. it's not uncommon for a commodity plane to be out of flatness on the sole up to .010 but the sides usually run almost .030 out of perpendicularity. if you have access to a machine shop with a surface grinder this is the way to go imo.

Last edited by arie; 06-13-2013 at 09:18 AM.
Reply With Quote
  #37  
Old 06-15-2013, 02:24 PM
Viking Viking is offline
Registered User
 
Join Date: Mar 2013
Location: Colorado Springs, CO
Posts: 234
Default

Quote:
Originally Posted by HCG Canada View Post
Nice work Viking. Look forward to hearing your results (hopefully all positive). ;-)
So wow. Got my first perfectly jointed piece today. Candled against the sun, no light. Factors that lead to success were, lapped plane sole and side, sharp blade, finely adjusted so that it was cutting very fine shavings, and selectively cutting along the edge where light was not showing through during the previous candle (shaving down the high points). And, a better set up for the shooting board. I ended up using my 2 foot granite slab. Gives a firm, flat surface to clamp the wood to, it's heavy so it doesn't move easily (though I did clamp it to my work bench), and it gives the plane a smooth surface to ride on.

Eventually, I think I'll probably be able to get it down to 10 minutes or less. With the plane finely adjusted, seems like a good formula for success will be... to first make sure that the edges are surfaced, then 1 or 2 more even cuts, candle, then shave the high points till a successful candle. It's funny, takes more time situating the wood in and out of the clamps on the shooting board than the actual planing.

And there's something about the sensations of a sharp blade cutting through the wood. Makes a hissing sound and has a very particular feel, like the wood is subtly resisting the blade. Very satisfying experience.

Thanks for the help guys.
Reply With Quote
  #38  
Old 06-15-2013, 09:53 PM
Ned Milburn Ned Milburn is offline
Registered User
 
Join Date: Feb 2011
Location: Dartmouth, NS
Posts: 3,127
Default

Quote:
Originally Posted by Viking View Post
So wow. Got my first perfectly jointed piece today. Candled against the sun, no light. Factors that lead to success were, lapped plane sole and side, sharp blade, finely adjusted so that it was cutting very fine shavings, and selectively cutting along the edge where light was not showing through during the previous candle (shaving down the high points). And, a better set up for the shooting board. I ended up using my 2 foot granite slab. Gives a firm, flat surface to clamp the wood to, it's heavy so it doesn't move easily (though I did clamp it to my work bench), and it gives the plane a smooth surface to ride on.

Eventually, I think I'll probably be able to get it down to 10 minutes or less. With the plane finely adjusted, seems like a good formula for success will be... to first make sure that the edges are surfaced, then 1 or 2 more even cuts, candle, then shave the high points till a successful candle. It's funny, takes more time situating the wood in and out of the clamps on the shooting board than the actual planing.

And there's something about the sensations of a sharp blade cutting through the wood. Makes a hissing sound and has a very particular feel, like the wood is subtly resisting the blade. Very satisfying experience.

Thanks for the help guys.
Great news! Thanks for posting your results.
__________________
----

Ned Milburn
NSDCC Master Artisan
Dartmouth, Nova Scotia
Reply With Quote
  #39  
Old 06-15-2013, 10:55 PM
charles Tauber charles Tauber is offline
Registered User
 
Join Date: Feb 2011
Posts: 8,381
Default

Quote:
Originally Posted by Viking View Post
It's funny, takes more time situating the wood in and out of the clamps on the shooting board than the actual planing.
http://www.fineboxes.com/ShootingBoard.htm


http://www.lie-nielsen.com/pdf/shootingboard.pdf

You can lose the clamps.

Last edited by charles Tauber; 06-15-2013 at 11:10 PM.
Reply With Quote
  #40  
Old 06-16-2013, 03:45 PM
Viking Viking is offline
Registered User
 
Join Date: Mar 2013
Location: Colorado Springs, CO
Posts: 234
Default

Quote:
Originally Posted by charles Tauber View Post
Interesting. I suppose one clamps a piece of wood longitudinally next to the material being jointed to keep the material from moving laterally? Or do you just hold it steady with your hands?
Reply With Quote
  #41  
Old 06-16-2013, 04:25 PM
charles Tauber charles Tauber is offline
Registered User
 
Join Date: Feb 2011
Posts: 8,381
Default

The forces on the board to be jointed are mostly longitudinal. The stop at the end of the shooting board takes that force. Not very much force is required laterally to keep the board against the blade.

The arrangements shown are common, traditional cabinetmakers' shooting boards. Often they will have a piece on the near end attached to the bottom to act like a bench hook. If you unfamiliar with a bench hook, another traditional cabinetmaker's tool, it will be well worth your while to do so and make one yourself.
Reply With Quote
  #42  
Old 06-20-2013, 03:15 PM
murrmac123 murrmac123 is offline
Registered User
 
Join Date: Dec 2008
Location: Edinburgh, bonny Scotland
Posts: 5,197
Default

At this point, I would just like to add an addendum concerning truing up the sides of your plane.

Charles and I have crossed swords before on this matter , my take being that it is not strictly necessary for the sole and the side to be square to each other since you can easily compensate by shimming the side to bring it to a perfect right angle.

Nonetheless, there is no disputing that it is definitely preferable if the side of the plane is at a perfect 90 degrees to the sole, and there is also no disputing that this condition is rarely if ever achieved by budget planes like Record and Stanley ex-works.

What you need to do is find somebody with a 12" heavy- duty disc sander, and buy a 12" disc of the coarsest aluminum oxide grit you can obtain. 36 grit is ideal ...24 is maybe a tad coarse ...40 is also good but no finer than that ...

So, affix the disc (has to be PSA btw ...NOT Velcro) set the table to an accurate 90 degrees and proceed to sand the side of the plane square to the sole. It requires a degree of skill to do this, but as long as you are aware that half of the disc is always ascending , and the other half is always descending, you should be good to go.

NB ...you only need to sand one side of the plane ... which side depends on whether you will use it right handed or left handed ...
Reply With Quote
  #43  
Old 06-20-2013, 04:57 PM
mercy mercy is offline
Registered User
 
Join Date: Jun 2007
Location: Inland Empire, So California
Posts: 6,246
Default

Thank you all for sharing your skills
Reply With Quote
  #44  
Old 06-20-2013, 05:08 PM
jeff crisp jeff crisp is offline
Registered User
 
Join Date: Jan 2012
Posts: 2,062
Default

Yes, for such a meat and potatos kind of question I've found this a very interesting thread.
Reply With Quote
  #45  
Old 06-20-2013, 07:15 PM
Viking Viking is offline
Registered User
 
Join Date: Mar 2013
Location: Colorado Springs, CO
Posts: 234
Default

Quote:
Originally Posted by murrmac123 View Post
At this point, I would just like to add an addendum concerning truing up the sides of your plane.

Charles and I have crossed swords before on this matter , my take being that it is not strictly necessary for the sole and the side to be square to each other since you can easily compensate by shimming the side to bring it to a perfect right angle.

Nonetheless, there is no disputing that it is definitely preferable if the side of the plane is at a perfect 90 degrees to the sole, and there is also no disputing that this condition is rarely if ever achieved by budget planes like Record and Stanley ex-works.

What you need to do is find somebody with a 12" heavy- duty disc sander, and buy a 12" disc of the coarsest aluminum oxide grit you can obtain. 36 grit is ideal ...24 is maybe a tad coarse ...40 is also good but no finer than that ...

So, affix the disc (has to be PSA btw ...NOT Velcro) set the table to an accurate 90 degrees and proceed to sand the side of the plane square to the sole. It requires a degree of skill to do this, but as long as you are aware that half of the disc is always ascending , and the other half is always descending, you should be good to go.

NB ...you only need to sand one side of the plane ... which side depends on whether you will use it right handed or left handed ...
How important is it really to have the side be perfectly perpendicular to the sole? Using the typical shooting board setup to joint the edges, the halves will mate up perfectly when laid flat, even if the joint is not perpendicular to the face.

At least, that's what I've read from a number of other sources.
Reply With Quote
Reply

  The Acoustic Guitar Forum > General Acoustic Guitar and Amplification Discussion > Build and Repair


All times are GMT -6. The time now is 01:54 AM.


Powered by vBulletin® Version 3.8.11
Copyright ©2000 - 2024, vBulletin Solutions Inc.
Copyright ©2000 - 2022, The Acoustic Guitar Forum
vB Ad Management by =RedTyger=