
|
|
#61
 03-26-2016, 10:34 PM
|
|||
|
|||
|
Depending on how you construct your top, you may want to wait before sanding the bottom of the bridge. If your top is domed, or you effect a dome by means of bracing, then you'd want to shape the bridge bottom to that dome, which is usually done by taping sandpaper to the guitar and running the bottom of the bridge to match the contour. You can scrape the sand lines off once you're done. If you require a flat surface for a flat top attach sandpaper to a known flat surface.
Of course, without the neck attached to the body, unless you made drawings, you may not know the geometry of he neck/body interface and then you may find your bridge is too high or too low, so it may be better to wait. On another subject, there is a school of thought on keeping some stiffness in the wings of the bridge. The wings are tapered such that they do not distort as much as a traditional bridge, but tapered (as yours) to reduce the overall weight, basically giving a higher stiffness to weight ratio. 
|
|
#62
03-27-2016, 02:02 PM
|
||||
|
||||
|
Quote:
Quote:
I'm hoping to join the top and back today. There's a community wood shop in my town that's willing to thickness sand them for me, so that's pretty exciting.
__________________
Solo acoustic guitar videos: This Boy is Damaged - Little Watercolor Pictures of Locomotives - Ragamuffin
|
|
#63
03-27-2016, 06:01 PM
|
||||
|
||||
|
The back has been jointed and glued, and the top has been jointed as well. I'll glue it tomorrow. I don't have enough clamps to do both at the same time.
I read somewhere about ensuring the jointed edge is "fresh" before gluing, i.e. not too much time should pass between the edge planing and the glue being applied. Something about not letting the edge oxidize. Any truth to that? Can a quick scrape right before I glue the top take care of it?
__________________
Solo acoustic guitar videos: This Boy is Damaged - Little Watercolor Pictures of Locomotives - Ragamuffin
|
|
#64
03-27-2016, 07:04 PM
|
|||
|
|||
|
Quote:
Just match the two sides , s t r e t c h several pieces of masking tape across the joint then fold the sides back and apply the glue. Close when the glue has been applied and the masking tape will supply all the clamping pressure you need. You do need to weight the top down flat when doing this of course.
|
|
#65
03-27-2016, 07:10 PM
|
||||
|
||||
|
Quote:
I do like the tape trick--will try with the top!
__________________
Solo acoustic guitar videos: This Boy is Damaged - Little Watercolor Pictures of Locomotives - Ragamuffin
|
|
#66
03-27-2016, 09:33 PM
|
|||
|
|||
|
Quote:
Quote:
Getting an invisible seam in a top is an art unto itself and can drive someone new to the process crazy in the pursuit of that joint. Getting the joint invisibly tight all along the length of the joint can be like a dog chasing its tail.
|
|
#67
03-27-2016, 09:50 PM
|
|||
|
|||
|
I personally use the tape clamps (green automotive painters' tape). I tape both sides to put even pressure, and it doesn't take a lot. If I join the boards right they stay flat and straight, and I just put a binder clip on each end of the joint and hang it on a rope I have running across the shop for hanging stuff.
|
|
#68
03-27-2016, 10:50 PM
|
||||
|
||||
|
Quote:
The back joint didn't turn out well. The joint is solid, but the two halves didn't mate in a perfectly level fashion, so one plate is higher or lower than the other in a couple of spots along the joint. I'll cut the glue joint tomorrow and try again, using the tape techniques suggested here so I can keep an eye on the action before the glue sets.
__________________
Solo acoustic guitar videos: This Boy is Damaged - Little Watercolor Pictures of Locomotives - Ragamuffin
|
|
#69
03-27-2016, 11:08 PM
|
|||
|
|||
|
It is difficult (impossible?) to have the two halves glue together so that they are exactly flush along the entire joint. Usually, one glues the halves together prior to final thicknessing to allow for that misalignment. Join first, thickness sand/plane to final thickness afterwards.
Variations on the masking tape method work. My preference is the traditional rope and wedges method. This is the Rolls Royce version of it: nice, but overkill. A simple version - six lengths of 1x2's, some rope and three wooden wedges - is about $10 to make yourself. (Don't forget to wax the faces of the 1x2's so they don't get glued to the top or back.) 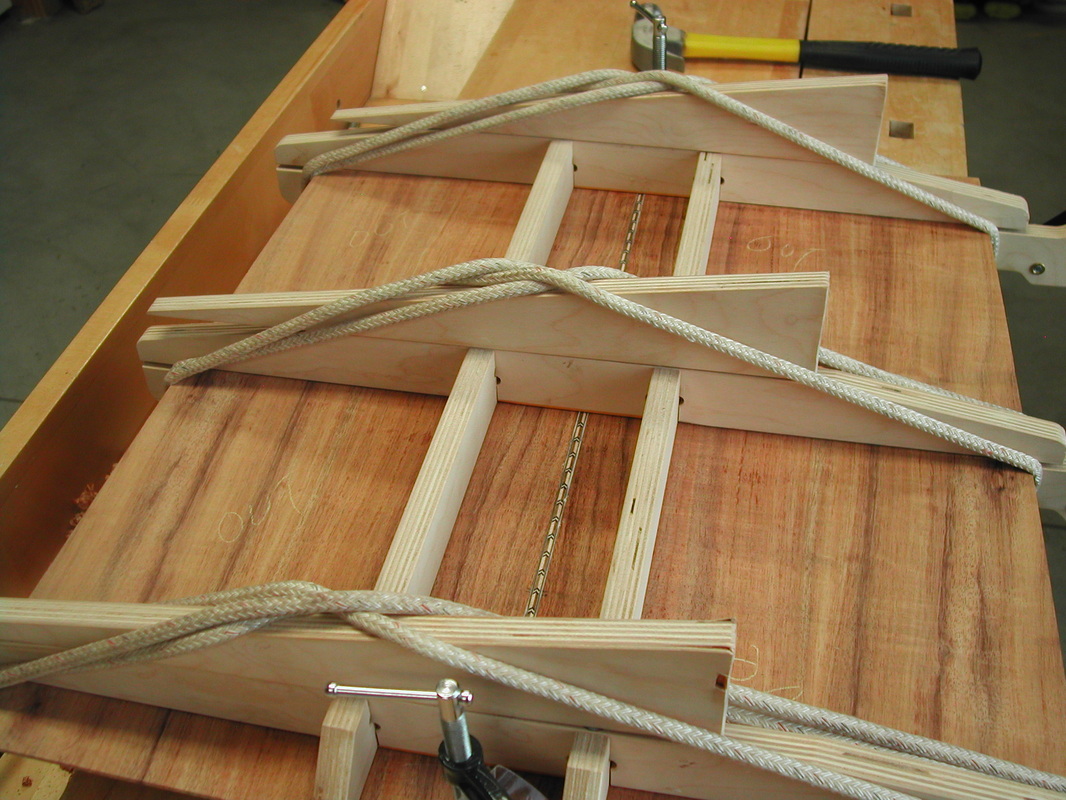
|
|
#70
03-27-2016, 11:20 PM
|
|||
|
|||
|
Quote:
|
|
#71
03-27-2016, 11:55 PM
|
||||
|
||||
|
Charles: I was thinking thickness planing would take care of the back, but it feels wrong. My first two joints actually turned out a lot better and flat, even though the first back wound up warping a lot. I think I should do better. Plus it's an opportunity to practice my shooting board technique.
__________________
Solo acoustic guitar videos: This Boy is Damaged - Little Watercolor Pictures of Locomotives - Ragamuffin
|
|
#72
03-28-2016, 06:13 AM
|
|||
|
|||
|
Quote:
|
|
#73
03-28-2016, 10:38 AM
|
|||
|
|||
|
Quote:
 Pat
|
|
#74
03-28-2016, 11:34 AM
|
||||
|
||||
|
Quote:
I saw a YouTube demo by a Scottish luthier who just has a channel routed in the bottom bars where the glued joint goes, so the glue doesn't make contact.
__________________
Solo acoustic guitar videos: This Boy is Damaged - Little Watercolor Pictures of Locomotives - Ragamuffin
|
|
#75
03-28-2016, 04:20 PM
|
||||
|
||||
|
So back to square one with the back. I cut through the joint this morning.
After watching a bunch of YouTube videos on shooting boards and plate joining, it struck me that my "workbench" and shooting board arrangement are part of the problem. The "workbench" is actually a bathroom vanity frame I built a while ago that didn't wind up being used. It's very small (20x24 or so) and wobbles. So I busted out the table saw and started making a number of jigs that should help. A properly sized shooting board is done, as are wedges and sticks for joining. I also cut the materials to make radiused dishes for the top and back. I should be able to do the joining again tomorrow. Thanks everyone again for the invaluable knowledge you're sharing with me.
__________________
Solo acoustic guitar videos: This Boy is Damaged - Little Watercolor Pictures of Locomotives - Ragamuffin
|


