
|
|
#136
 10-27-2017, 04:52 PM
|
|||
|
|||
|
Quote:

|
|
#137
10-27-2017, 05:00 PM
|
|||
|
|||
|
Quote:
|
|
#139
10-30-2017, 06:11 AM
|
|||
|
|||
|
Quote:
|
|
#140
10-30-2017, 06:30 PM
|
|||
|
|||
|
Thanks for all the replies on the tuners. Although I really wanted to go with something lighter than the Roto-matics that's what I ended up getting.
I found some awesome looking 18:1 Grovers in a bronze color at a very good deal on EBAY. Very cool looking finish, which I haven't seen on a set of tuners before. I think they will go with the overall look of this guitar great. Will post some pictures when they are delivered.
|
|
#141
11-08-2017, 07:16 PM
|
|||
|
|||
|
I've gotten a little more done.
Got my holes drilled for the tuners. Heel cap put on and bolted the neck to the body. Made a jig so I could string up the guitar and check the bridge placement for intonation. (saw a Stew-Mac video on this) Really worked well! Glad I tried this because where I had the bridge wasn't perfect. Guitar sounded pretty good but cant really tell for sure because I'm sure that home made "tailpiece" wasn't letting the top respond properly. That's my theory anyway. Those Grover Roto-matics gotta go, Way to heavy. Going with the Grover Sta-tites 18:1 and will now have to buy 10mm adapter bushings so I can use them. I Should have listened to start with. Think I'm going to have to work on the part of the neck where I glued a shim under the front of the fret board which lays down on the body. With the strings in tune the front of the fret board points upward. I have to drill a hole in the headstock plate so I can adjust the truss rod and see if that helps before I go to the trouble of attempting to get rid of the shim. 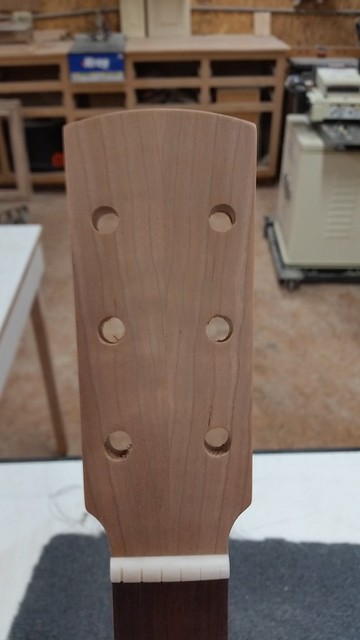 20171107_170928 by Cabinet Man, on Flickr 20171107_170928 by Cabinet Man, on Flickr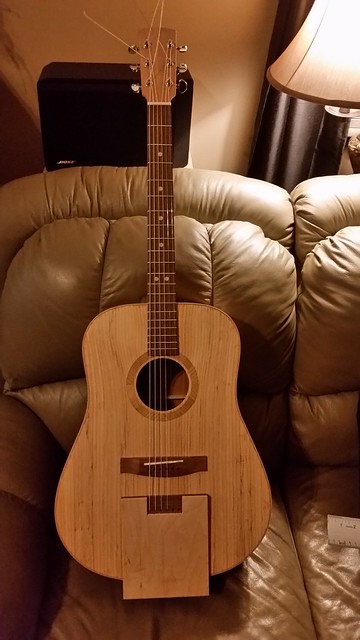 20171107_203812 by Cabinet Man, on Flickr 20171107_203812 by Cabinet Man, on Flickr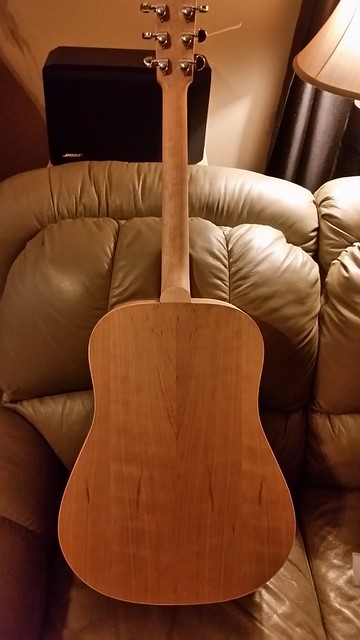 20171107_203845 by Cabinet Man, on Flickr 20171107_203845 by Cabinet Man, on Flickr
|
|
#142
11-09-2017, 06:03 PM
|
|||
|
|||
|
I made my access hole in the headstock plate to adjust the truss rod this afternoon.
I adjusted the truss rod and now the strings are pretty much dead from the 13th fret up. I'm going to have to some how remove most of that shim that I glued to the bottom of the fret board, Nice and EVEN. Man I dread doing that. Also, I got some Grover Sta-tites with 18:1 ratio ordered today as well as some 10mm bushings for them. Hopefully they will be much lighter than the Roto-matics.
|
|
#143
12-04-2017, 05:43 PM
|
|||
|
|||
|
Finally getting to work on the guitar a little more. I have been Super busy with work. I'm trying to get ready to apply the finish. I did go ahead and glue the bridge in place. My son has been playing it some and I am pleasantly surprised. I thinks it sounds pretty dog gone good myself. Of course, not bragging or nothing. I do feel like the action is a little too high, but the neck angle seems to be correct so I am going to try to shim up underneath the fret board. Don't really want to drop the bridge any lower than it already is. Anyone have a better Ideal of a way to do this. Will try to post some pics as soon as I can get time.
|
|
#144
12-04-2017, 09:11 PM
|
|||
|
|||
|
Quote:
|
|
#145
12-04-2017, 09:32 PM
|
|||
|
|||
|
Quote:
|
|
#146
12-06-2017, 06:58 PM
|
|||
|
|||
|
Ok, I the original shim that I had made and glued to the bottom of the fret board, as mentioned earlier, was all the same thickness. With that shim when I bolted up the neck and put string tension on it the front end of the fret board pointed or bowed up. So I removed most to the shim. (A pain in the behind to do and get it even.) When I did that it made the action too high.
I now have the neck bolted up where I want it, with the correct string height.(I have compared it to the two other acoustics we have in the house and its now the same.) So I now need to make a small tapered shim (thicker at the back than the front) to put back in place of the original one that was the same thickness for the full length of it. That will fill the small gap that's between the sound board and the bottom the fret board where the neck joins the body. As I said before, I should have never of glued that first shim in place until I had bolted up the neck and put string tension on it. When I did that first shim I had simply bolted up the neck, with it straight and flat, laid a straight edge down the fret board and it was level with the top of the bridge. So that's where I set the shim thickness at. Once string tension was applied to the neck everything changed. How do most of you all determine "neck angle/shim thickness" with out actually putting string tension on the neck?
|
|
#147
12-06-2017, 08:31 PM
|
|||
|
|||
|
Quote:
|
|
#148
12-07-2017, 08:32 AM
|
|||
|
|||
|
Congratulations on getting strings on! It's a great feeling - the end is now in sight.
So... On the question of "Everything moving"..... What specifically do you mean "everything moving"? Did the top lower bout "pull up" under string tension (expected) Did the neck angle shift under string tension (not expected)? If it was the neck angle.... Was the neck set kinda loose? Was there a gap at the neck heel/body due to the fretboard hitting the top? Perhaps the tenon hitting something in the mortise? Perhaps the neck bolts were just a bit loose? Or did the body geometry/upper bout shift a bit under string tension? (Generally not expected).
|
|
#149
12-07-2017, 08:36 AM
|
|||
|
|||
|
The most common quick and dirty neck set starting point is:
Fretted neck installed. Lay a straight edge on the frets and it should just hit the top of the bridge (no saddle). That will generally get you in the right ballpark.
|
|
#150
12-15-2017, 07:37 PM
|
|||
|
|||
|
I thought I'd post and let you all know that I found the problem with the Fert board/neck angle situation. I had to take a break for a few days on the guitar to get caught back up on my work and glad that I did. I was starting to get frustrated with not being able to figure out the problem.
Anyway, had a little time today while some stain was drying on some doors. I got to investigating and trying to figure out a shim to use or whether I need to change the neck angle or not. To make a somewhat long story short, I found a VERY SLIGHT hump on the sound board where the fret board extension sits on the top. All I had to do was sand a VERY small amount off where the fret board extension sits. What a world of difference it made, Its hard to believe that such a small amount could make such a huge difference. Its like a different guitar, the action is perfect and my son says it plays like a dream. I also put the Grover 18:1 sta-tites on instead of the Rotomatics. No its not neck heavy at all either. Excited to get the finish on it now. May try to do that tomorrow if time allows.
|


