
|
|
#1
 07-26-2017, 09:46 AM
|
|||
|
|||
|
Hi Folks, I've posted this before. You can use any method you want, including your own or Trance Audio's, but I've found the below works for me. Please excuse my overwhelming attention to detail as the installation is simpler than my narration!
It's VERY important not to contaminate the adhesive with bits of cardboard or foam, and that's why I don't like Trance's method of using the jig on the soundboard as a guide to bring the Amulets into place--It's very easy to touch the jig with the adhesive surface of the Amulet as you bring an Amulet into place on the bridgeplate! For visibility during installation, place a flat mirror on the back of the guitar directly below the bridge-pin holes with LED lights on each side. Proceed with making the jig per Trance's instructions, but don't use it to install the Amulets. Instead, here's what I now do: Once you've made the jig outside the guitar, put it inside the guitar on the bridgeplate using the golf tees. Take a short and sharp pencil and trace the two cutouts for the Amulets onto the bridgeplate. Now you'll see the locations where the Amulets will be placed. Remove the jig and take another foamboard (or whatever material you're using) 2" x 3" blank, which you may have already made if you made several blanks, and place the first jig on top of the new one, and trace the Amulet locations onto the new 2" x 3" blank. Also, make sure the golf-tee holes are in the same position. Put the jig inside the guitar to make sure the new jig will clear the braces when it's in location. If edges of the blank hit any braces, trim away a necessary amount of the blank where it's hitting. Don't cut away the areas on this jig that were cutout areas on the first jig as you'll need these areas to be solid where you'll mount the Amulets on this jig. Now, that you've made sure the new jig blank will fit inside on the bridgeplate and clear the braces, let's install the Treble-side Amulet first. Cut a slot from the front of the blank toward the bridge-saddle area but stop just beyond where the Amulet's lead-wire will be when the Amulet is on location when on and attached to this second jig. Peel away a piece of Permanent Tape from the backing sheet on which it's supplied and carefully place the exposed adhesive side on the business side of the Amulet. Be careful not to contaminate the Amulet's exposed adhesive after removing it from its backing sheet and try to lay the tape onto the Amulet without having to pull it free again as this will pull the adhesive out of shape. Once the tape is on the Amulet, press the Amulet firmly against a flat surface to seat it evenly and then trim the overhang with sharp scissors. Leave the RED backing on the adhesive's outer surface. Put two small pieces of the Semi-permanent Tape, each about 3/8" x 1/4", to the lead-wire side of the Amulet, one on the end of the Amulet and one near the leadwire, with the 3/8" dimension across the width of the Amulet. CAREFULLY peel away the RED protective cover of the permanent tape by carefully pricking at a corner with a razor blade until you see the RED protective cover peel away. Work it enough so there is enough RED protective covering to grab between your thumb and the razor blade. Now, CAREFULLY and SLOWLY peel back the RED cover until it's free of the adhesive. Watch the adhesive doesn't pull up as you're doing this. Carefully affix the Amulet (with lead-wire side down and in the slot) to the traced mounting location on the jig with pieces of the semi-permanent tape that come with the Amulet. Position the leadwire within the guitar so it's not dragging on the Amulet. Now, looking through the bridgepin holes (bright LED light is a must inside the guitar!), reach in with the jig and be careful not to hang it up on anything. Bring the jig with the Amulet slowly up to the bridgeplate while keeping the jig parallel to it or tipped slightly forward so you can engage the golf tees with the bridgepin holes. Watch that the Amulet doesn't shift on the jig as you bring the jig up to the bridgeplate--you'll see it's relative location to the traced cutout lines on the bridgeplate. If it does shift, you can wiggle it slightly with your fingers to get it back on location. Continue on until you hit the bridgeplate squarely with the Amulet in its proper location. Press on the jig under the Amulet with light to lightly-firm pressure. Pry away the jig with a pointed object. It should release easily without disturbing or pulling the Amulet off location. At this time, I will clamp the Amulet in place with a deep-throat, lightweight C-clamp for 12-hours or more. If it's all you have handy, you can try using the supplied Trance turnbuckle thrust-clamp too. Another method, which I don't really like, is to press on the Amulet using firm finger-pressure for ten to fifteen minutes and likely your installation will be okay. I've done it with and without a C-clamp with good results. Remove clamp and proceed with Bass-side Amulet BUT cutway enough of the first Amulet's half of the jig so the second Amulet and cardboard jig can clear the installed Amulet. Also, cutaway a portion of the jig where the leadwire end of the bass Amulet will be. See the jig photo below. Proceed as above. A few photos showing some aspects of Trance Amulet mounting in a Martin HD-28 and useful tools. Note the Amulet locations penciled-in on the bridgeplate using the Trance recommended homemade jig design as a template (left jig in photo). I made my jigs from 1/8"-thick foamboard. Amulets were then positioned using the second jig (right jig in photo) that has been cut away for clearance to enable positioning of the Bass-side Amulet as mentioned in my preceding post. Also, note how the Bass-side of the jig has a portion of the left-side of the jig removed to accommodate the leadwire. Look through the bridge-pin holes for guidance of jig with Amulet to penciled guide-lines. Clamp is tightened using finger-pressure until enough pressure is attained so clamp doesn't move on bridge or Amulet and a bit of crush is seen on foamboard caul (I'm guessing clamp-screw torque is maybe 2 to 3 lbs ft). The Amulets seem to be quite ruggedly-built and I've never cracked one and the nylon clamp cauls and foamboard help protect the Amulets and bridge from any marking. Deep-throat, lightweight C-clamps are available from Stewart-MacDonald. The one in photos is the smallest at 5-inch throat depth. The 7-inch throat-depth and larger available C-clamps have a leveler on the clamp that takes the place of the foamboard I used to support rear-end weight of the clamp on the guitar's top but the leveler on the deeper clamps may be too far back on the clamp and be over the soundhole to be of use in this installation. 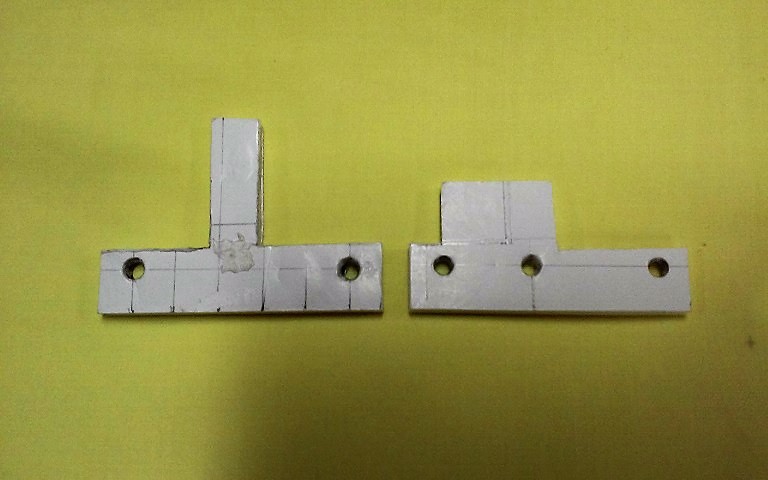 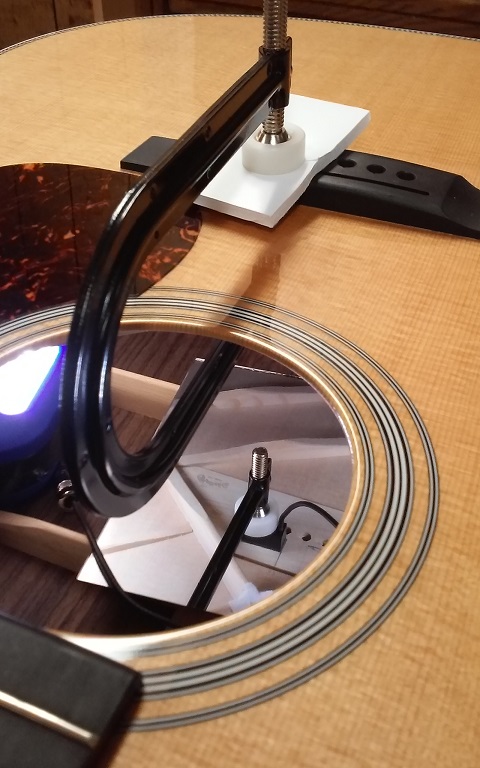 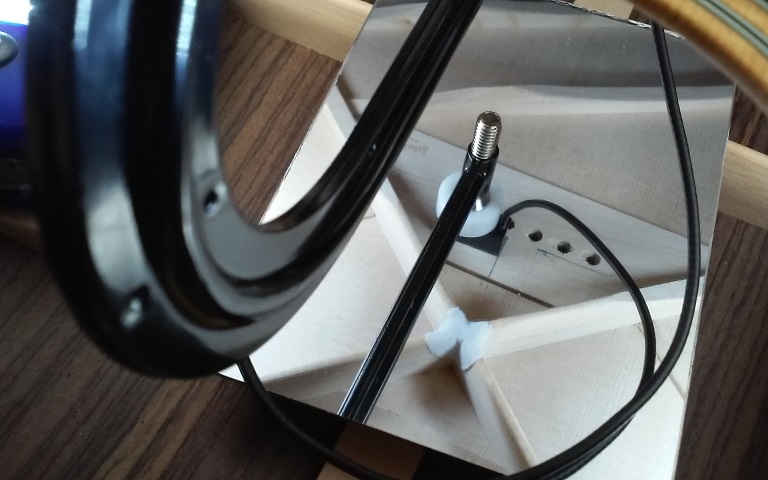 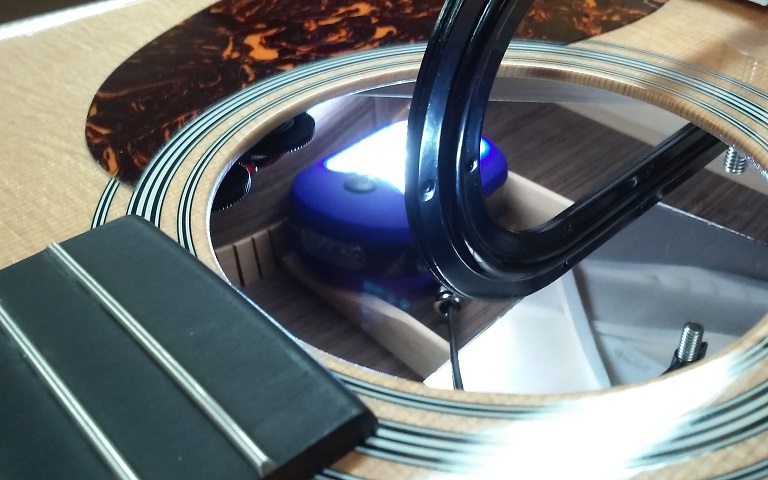   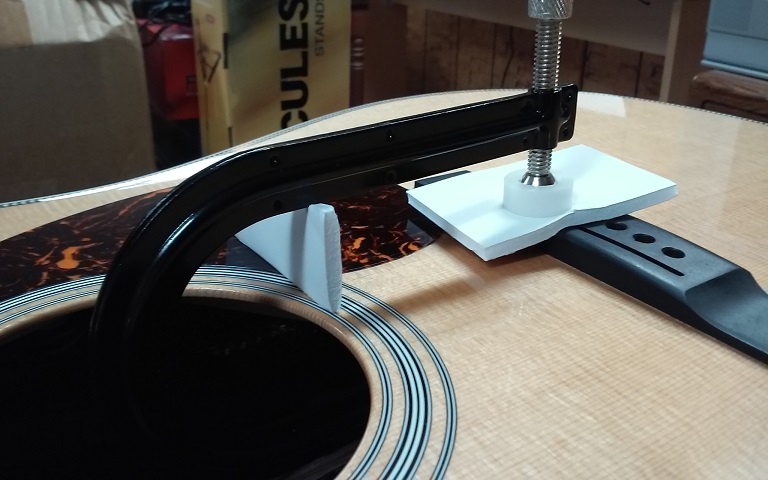
__________________
Martin HD-28 Sunburst/Trance M-VT Phantom Martin D-18/UltraTonic Adamas I 2087GT-8 Ovation Custom Legend LX Guild F-212XL STD Huss & Dalton TD-R Taylor 717e Taylor 618e Taylor 614ce Larrivee D-50M/HiFi Larrivee D-40R Blue Grass Special/HiFi Larrivee D-40R Sunburst Larrivee C-03R TE/Trance M-VT Phantom RainSong BI-DR1000N2 Emerald X20 Yamaha FGX5 Republic Duolian/Schatten NR-2 Last edited by SpruceTop; 07-26-2017 at 10:18 AM. 
|
|
#2
07-26-2017, 01:11 PM
|
|||
|
|||
|
Great public service Ken!
__________________
"Lift your head and smile at trouble. You'll find happiness someday."
|
|
#3
07-26-2017, 02:20 PM
|
||||
|
||||
|
That's great Ken! Thanks for posting this!
I need to get one of those C clamps if I do another install. I used the one that Trance supplied. It worked but this looks much easier to use. Matt
|
|
#4
07-27-2017, 12:30 AM
|
|||
|
|||
 Why do I see this thread now? Why do I see this thread now?Thanks Ken, I have to wait 12h to try that. lol. I think I'll take a break after this one. If the strings are balanced (which should not be the case since I miss the alignement due to stress and multiple try damaging the template  ) I'll just make an IR to make it sound right. ) I'll just make an IR to make it sound right.Cuki
__________________
Martin 00-18V Goldplus + internal mic (2003) Martin OM-28V + HFN + internal mic (1999) Eastman E6OM (2019) Trance Audio Amulet Yamaha FGX-412 (1998) Gibson Les Paul Standard 1958 Reissue (2013) Fender Stratocaster American Vintage 1954 (2014) http://acousticir.free.fr/
|
|
#5
07-27-2017, 09:47 AM
|
|||
|
|||
|
Quote:
__________________
Martin HD-28 Sunburst/Trance M-VT Phantom Martin D-18/UltraTonic Adamas I 2087GT-8 Ovation Custom Legend LX Guild F-212XL STD Huss & Dalton TD-R Taylor 717e Taylor 618e Taylor 614ce Larrivee D-50M/HiFi Larrivee D-40R Blue Grass Special/HiFi Larrivee D-40R Sunburst Larrivee C-03R TE/Trance M-VT Phantom RainSong BI-DR1000N2 Emerald X20 Yamaha FGX5 Republic Duolian/Schatten NR-2
|
|
#6
07-27-2017, 09:55 AM
|
|||
|
|||
|
It should be easy enough to make a plastic jig to install the Amulets by buying a small sheet of 3/32-inch (.093") thick Plexiglas, Lexan or similar plastic material and a plastic/glass hand-cutting tool. Use a straight-edge to layout the jig and use the hand-cutter to score and carefully break away the plastic along the scored lines. For an outlay of about $20, you'd have plenty of material to experiment with in devising a very useable jig, even make it adjustable.
__________________
Martin HD-28 Sunburst/Trance M-VT Phantom Martin D-18/UltraTonic Adamas I 2087GT-8 Ovation Custom Legend LX Guild F-212XL STD Huss & Dalton TD-R Taylor 717e Taylor 618e Taylor 614ce Larrivee D-50M/HiFi Larrivee D-40R Blue Grass Special/HiFi Larrivee D-40R Sunburst Larrivee C-03R TE/Trance M-VT Phantom RainSong BI-DR1000N2 Emerald X20 Yamaha FGX5 Republic Duolian/Schatten NR-2 Last edited by SpruceTop; 07-27-2017 at 10:02 AM.
|
|
#7
07-27-2017, 03:20 PM
|
|||
|
|||
|
Got Gary Hull on the phone.
I've learned a lot. Unfortunately I won't have time to reinstall before 2 weeks. The sound I have is not bad but could be better now I know how to do it. Any Amulet user should call Gary. Cuki
__________________
Martin 00-18V Goldplus + internal mic (2003) Martin OM-28V + HFN + internal mic (1999) Eastman E6OM (2019) Trance Audio Amulet Yamaha FGX-412 (1998) Gibson Les Paul Standard 1958 Reissue (2013) Fender Stratocaster American Vintage 1954 (2014) http://acousticir.free.fr/
|
|
#8
07-27-2017, 03:38 PM
|
|||
|
|||
|
Quote:
|
|
#9
07-27-2017, 03:55 PM
|
|||
|
|||
|
Quote:
1) Moving // to the saddle line enables to balance string to string volume. 2) He said that it was not a big deal if you did not find the right spot at 1st time or touch the cardboard. (As far as polution of the red tape is concerned) 3) Most important he said that it is important to test with audio. What he does is to put the E string, tune it, install the pickup and the clamp. Then he tunes the clamp so it pushes the pickup but can still be moved. 4) He shifts the clamp (not the pickup) over the pickup surface and tries to find the "focus" point by plucking his E string. The focus point is when the bass and low mids are there. When the position is found, he puts the pressure and listen if the volume of the E string rises accordingly. 5) He said the red tape curing was triggered by pressure and that it needed 8-12h to be perfectly bond. I never read that anywhere. From what I understood the sweet spot lies on the pickup surface and not on the bridge plate surface. I was so suprised: I asked him a second time:"Do you move the pickup or the clamp". He said "the clamp, the pickup does not move". He said there were many thing wrong in the forums and that people should just call him. Petty1818, just call him Cuki
__________________
Martin 00-18V Goldplus + internal mic (2003) Martin OM-28V + HFN + internal mic (1999) Eastman E6OM (2019) Trance Audio Amulet Yamaha FGX-412 (1998) Gibson Les Paul Standard 1958 Reissue (2013) Fender Stratocaster American Vintage 1954 (2014) http://acousticir.free.fr/
|
|
#10
07-27-2017, 04:07 PM
|
|||
|
|||
|
Quote:
Edit: I just installed the treble transducer back to the original jig placement. The 3mm movement towards the sound hole had done nothing, except add feedback so I figured I would go back to the start. I clamped it on its own this time and will do the same with the bass once this one sets. I am hopeful that the correct clamp method will result in a better tone. I just want to add that I tried Gary's recommendation of installing the treble pickup, installing the E string, testing the tone through a speaker and then clamping it to see how the clamp adds to the volume/tone. To be honest, once I started to tighten the clamp and pluck the E string, all I would get was a ton of feedback, even at low volumes. I just turned the speaker off, clamped it and put it back in its case for the 12 hour wait. Last edited by Petty1818; 07-27-2017 at 04:57 PM.
|
|
#11
07-28-2017, 07:51 AM
|
|||
|
|||
|
My ONLY Trance experience is with the M-VT system (I have two of them), and which I've always recommended folks buy if they're buying a Trance Amulet M Dual Mono system. The Full Treble Tone Control M-VT soundfile I posted represents what a non-Trance system likely sounds like without EQ and I wouldn't be satisfied with that tone either. More Martin HD-28/Trance Amulet M-VT soundfiles coming up that will better demonstrate a better balanced tone than the so-called Balanced Tone soundfile I also posted. It's possible to achieve the tone I want by just a turn of the M-VT Tonewheel. Remember, you can turn your Amulet M into an M-VT system by ordering the M-VT module/wire harness to add to your system.
__________________
Martin HD-28 Sunburst/Trance M-VT Phantom Martin D-18/UltraTonic Adamas I 2087GT-8 Ovation Custom Legend LX Guild F-212XL STD Huss & Dalton TD-R Taylor 717e Taylor 618e Taylor 614ce Larrivee D-50M/HiFi Larrivee D-40R Blue Grass Special/HiFi Larrivee D-40R Sunburst Larrivee C-03R TE/Trance M-VT Phantom RainSong BI-DR1000N2 Emerald X20 Yamaha FGX5 Republic Duolian/Schatten NR-2
|
|
#12
07-28-2017, 09:26 AM
|
|||
|
|||
|
Quote:
|
|
#13
07-28-2017, 12:46 PM
|
|||
|
|||
|
Quote:
I made this EXACT point to Cuki in private last night. I firmly agree.
__________________
"Lift your head and smile at trouble. You'll find happiness someday."
|
|
#14
07-28-2017, 05:19 PM
|
|||
|
|||
|
Quote:
|
|
#15
07-28-2017, 09:05 PM
|
|||
|
|||
|
Quote:
Good luck! Break a leg!
__________________
"Lift your head and smile at trouble. You'll find happiness someday."
|


