
|
|
#1
 03-24-2017, 03:13 PM
|
|||
|
|||
|
http://www.acousticguitarforum.com/f...d.php?t=460396
Following on from the Cutty Sark/SS Pegu and a Guitar thread (above) I am now a few weeks into the build and the sides have taken shape although needing fine finishing. I suppose sides is not the correct term as it is one continuous piece - so more of a carcass than two sides. This is made up of 64 individual planks cut from the salvaged SS Pegu Teak. These are 14mm deep and 3mm wide and go together to form the main body of the carcass. Not looking too bad for wood that's spent 94 years at the bottom of the sea. The top and bottom of the carcass are made from another 64 individual pieces of Oak set with the grain of each piece running at 90 degrees to its neighbour for visual effect Oak being yet another non-traditional wood. The Oak is wider than the Teak to act as the Kerfing layer and is recessed to accommodate the soundboard and back. Each plank has a lug with a 6mm hole through to allow alignment when assembling and gluing. To strengthen the carcass, once glued, the holes were filled with dowelling to further interlock all pieces. 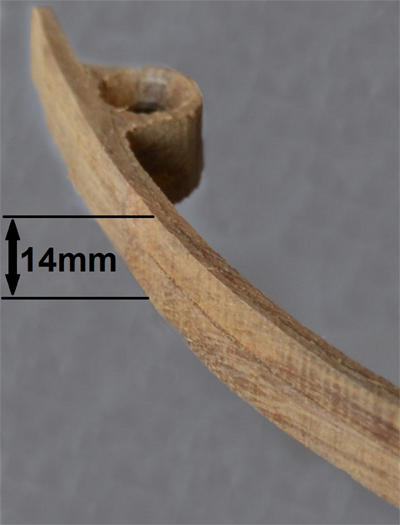 Individual rough cut 'plank' showing 6mm lug to the inside.  Left side of carcass.  Right side of carcass with cuttaway.  Carcass base. Carcass is now put safely away whilst I go off to concentrate on the Cedar front. Last edited by Ozzy the dog; 07-08-2017 at 07:57 AM. 
|
|
#3
03-25-2017, 07:09 AM
|
||||
|
||||
|
People can dismiss the Teak all they want in the first thread, but I would think anyone would be hard pressed to say that it did not come out beautifully at least to look at. We will see on sound right?
__________________
PS. I love guitars!
|
|
#4
03-25-2017, 11:11 AM
|
|||
|
|||
|
Wow--a challenging build to say the least. Definitely worth the effort visually.
Looking forward to seeing your progress on this one--the cedar top should complement the teak nicely.
__________________
2013 Stehr Auditorium (Carpathian/Myrtle) 2015 Stehr Auditorium (Adi/BRW) 2020 Baranik Meridian (Blue Spruce/Manchinga) 2020 Wilborn Arum (Tunnel 14/Coco) 2021 Kinnaird Graybeard (BC Cedar/Bog Oak) 2022 Kinnaird CS Student Build (Adi/Padauk) 2023 Kinnaird FS (Italian/Koa)
|
|
#5
03-25-2017, 03:50 PM
|
||||
|
||||
|
What an interesting concept ... I just love stuff like this!
__________________
David Wren
|
|
#6
03-25-2017, 04:02 PM
|
|||
|
|||
|
Thanks for the positive comments so far...
Quote:
About 20 years ago I experimented with an idea for bracing which works completely differently to traditional design and allows the soundboard to vibrate more freely and evenly. I will be reviving and updating (but keeping secret) this here so hopefully this will counter the negatives from the Teak. Then again, it might be the final nail that completely destroys it but we won't know until it's finished. That's what I love about experimenting and even if it doesn't work tonally, I'm reasonably confident it will be OK to look at.
|
|
#7
04-01-2017, 02:17 PM
|
|||
|
|||
|
This week's time has been spent preparing the Cedar soundboard and sound hole. Everything is in a slightly rough state at the moment but hopefully it will all look better when fully finished.
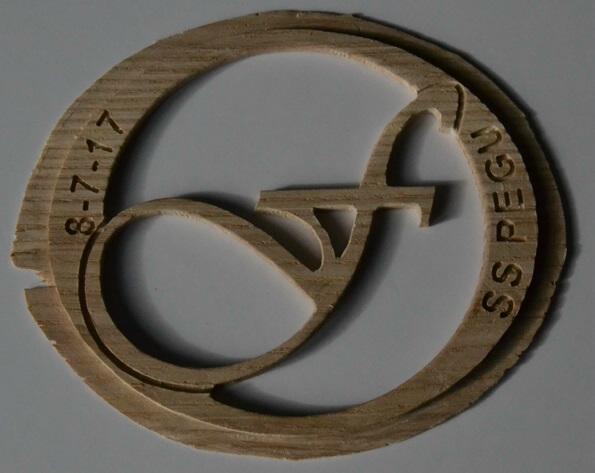 The sound hole 'plug' is made from the same Oak that was used for the top and bottom of the carcass. The design is not a misunderstanding of an 'F' hole but is actually based on my initials F.O. This is slightly thicker than the Cedar to allow strength for the delicate 'f' and to overlap the soundboard and provide a little extra strength here as well. 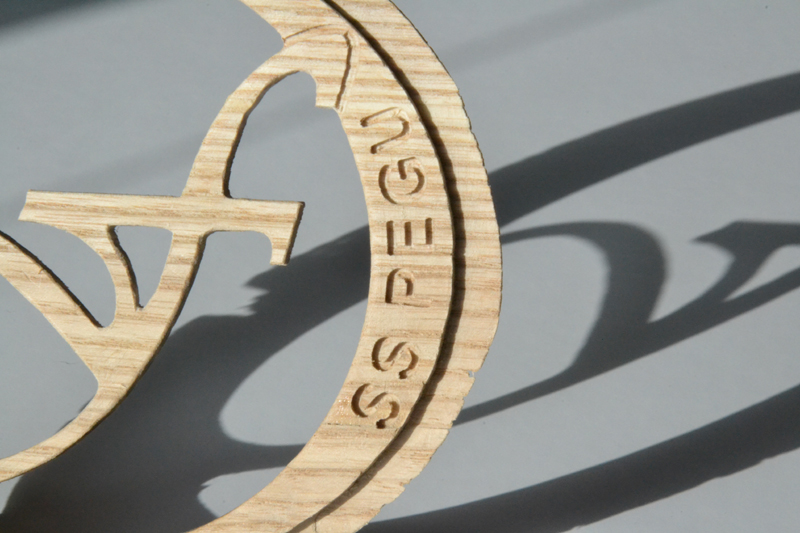 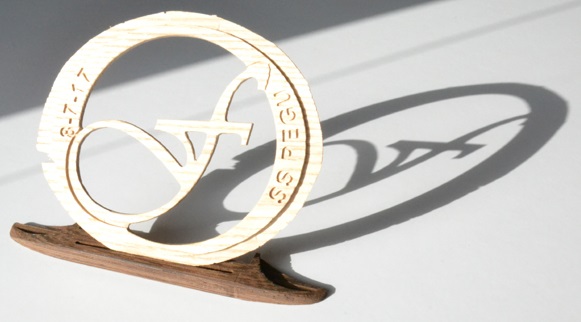 In addition to the SS PEGU text cut into the Oak, I have included the date 8-7-17. This is in UK format to represent 8th July as the date the SS Pegu was sunk during WW1. I have left the year as '17' as this represents both '1917', the year of sinking and '2017' as the year the guitar was built. If all goes to plan, the final part of the build will be put into place on 8th July this year to mark the 100th anniversary of the sinking of the Pegu. 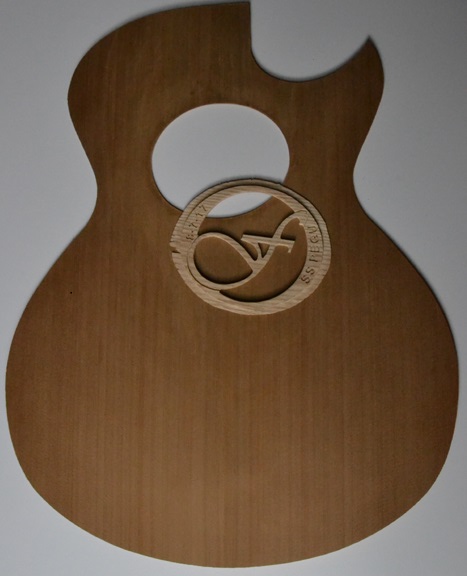 I have placed the plug loosely into the soundboard to give an idea of the finished look. I'm still considering options to fill the lettering so watch this space. 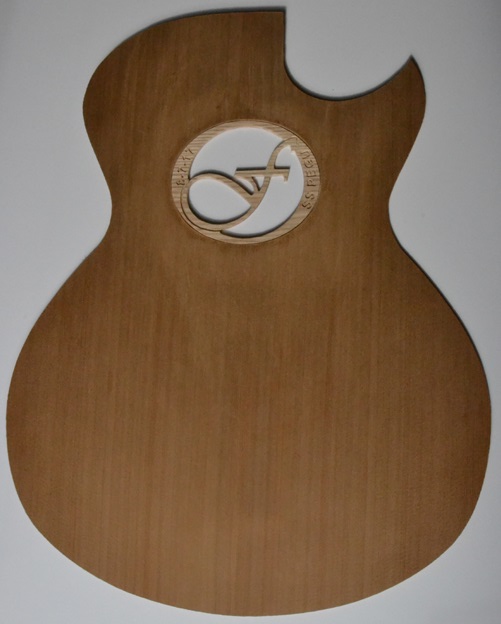 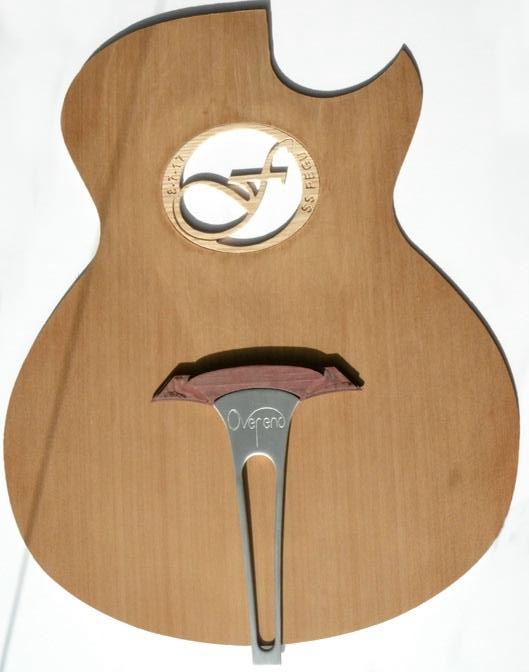 The aluminium tailpiece and Purpleheart bridge are actually for another guitar build but are placed here to give an idea of where I'm going with it. The bridge for this guitar will either be made from Wenge or Ebony with an aluminium tailpiece similar to the one pictured.
|
|
#8
04-01-2017, 06:29 PM
|
||||
|
||||
|
I knew that this was going to be a fun build to watch, OtD.
Can't wait to hear what she sounds like...and ends up looking like!!!
__________________
17 Two Hands Guitar Co. 000/Concert, Sitka/Brazilian Imbuia 17 Two Hands Guitar Co. 0000/Auditorium, Sitka/Indonesian RW 93 Taylor 712 (I spent 20 years trying to convince the owner to sell me this guitar) 95 Taylor Limited Edition GAWS (I traded my Gibson J-200 for this guitar in 95) TWO HANDS GUITARS
|
|
#9
04-01-2017, 07:01 PM
|
|||
|
|||
|
Pretty cool!
|
|
#10
04-02-2017, 01:31 AM
|
|||
|
|||
|
nice, reminds me of a violin I made with 3 piece ribs/sides, stacked like your doing
__________________
http://www.jessupegoldastini.com/
|
|
#11
04-02-2017, 04:11 AM
|
|||
|
|||
|
Envy is a sin, I shall repent.....one day! That looks fantastic as it is, can't wait to see the finished product. Who cares what it sounds like.......yeah! right!
How did you do the sound hole 'plug' Was it cut/etched by hand or did you use some form of cnc machinery? I'd love to see some piccies of you creating it.
__________________
Maton CE60D Ibanez Blazer Washburn Taurus T25NMK
|
|
#12
04-02-2017, 04:54 PM
|
|||
|
|||
|
Quote:
The rest of it - the carcass 'planks' and soundboard were cut out with the band saw and clamped and glued together on a homemade jig.
|
|
#13
04-24-2017, 04:40 AM
|
|||
|
|||
|
Things havent gone completely to plan with the latest part of this build.
We learn from experimenting and hands on experience and just after my last update I learned two very important lessons. Lesson 1 was that whenever my wife tells me Im stupid, she is right. Lesson 2 (which led me to realise lesson 1) is that when it comes to index finger versus Hack saw blade never put your money on the finger. I am usually very careful and protective of my fingers but this was one of those quick cut situations and the closest thing to hand was the Hack saw two seconds later, the closest thing to bone was the Hack saw blade. This led to a delay in development but worse, it meant being unable to play guitar for a couple of weeks.  Anyway, were back on the go now and here are a few pics of the latest bits. In keeping with the salvage theme that seems to be growing as the build progresses, I have managed to find some more excellent pieces that have been sitting waiting for this guitar. Just a couple of miles from where I live is a wonderful semi-retired luthier (Fred Laugharne) who had some well-aged and seasoned timbers that had been in storage since the early 90s. Fred had some lovely Mahogany pieces perfect for the back and neck and also some wonderful Ebony banks from the all black era for the fret board. 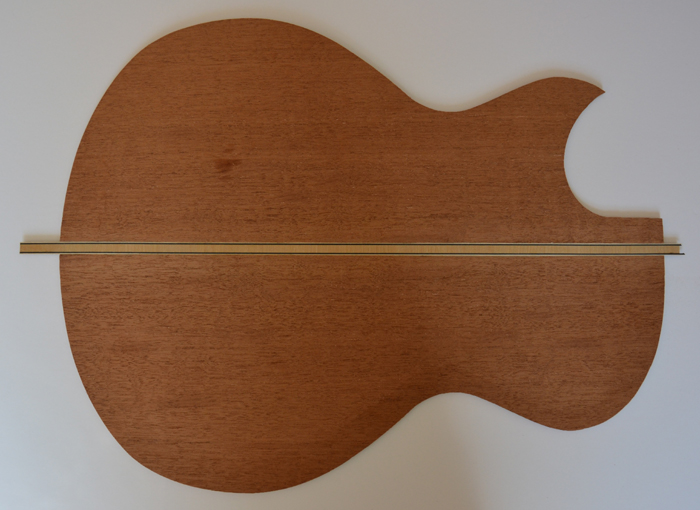 Mahogany back. 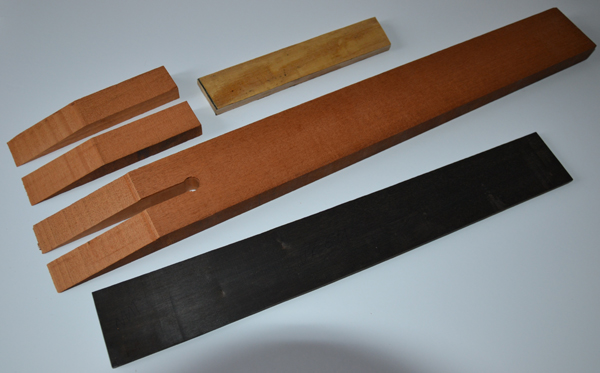 Neck and fret board.  Oak sandwich. 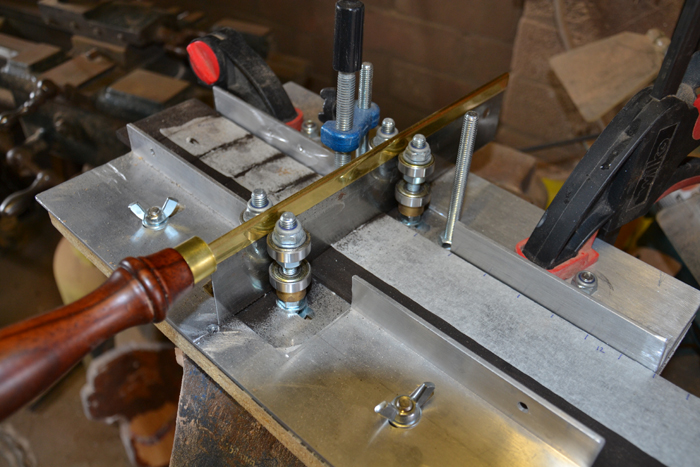 Cutting fret slots on homemade jig and the high tech masking tape marker system. I found a Wenge turning blank 50mm x 50mm x 200mm hidden away in my garage that I had forgotten I had. It has been there for at least 20 years so that had to be used somewhere on this guitar. I sliced it into several thin sections and used this to face off the head-stock and to make the bridge. I have shaped the head-stock and roughly cut the neck to shape with a strip of Oak running through the centre of the head-stock and into the neck to offer strength to the scarf joint.  Rear of neck.  Front of neck. The Copper logo inlaid in the Wenge head veneer is shaped from a strand of 30amp cooker wire. Each wire strand is approximately 1.2mm thick so I cut the lettering groove to a depth of 0.6mm and glued the wire strand into position. Once firmly set, the protruding face of the wire was sanded flat to the face of the head veneer. This gives the effect of the inlay being cut from a flat piece of Copper and is quite effective when it catches the light. 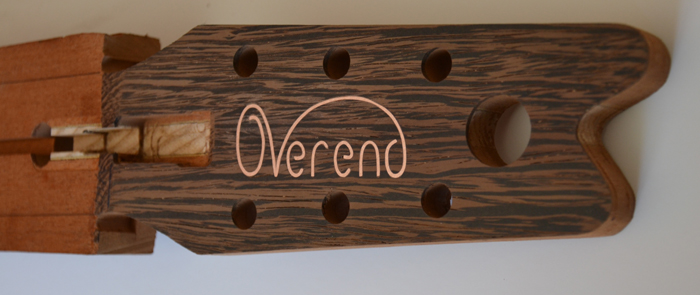 Copper inlay. 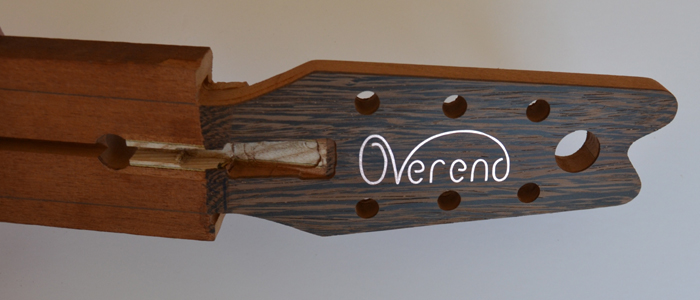 Shines with the light. 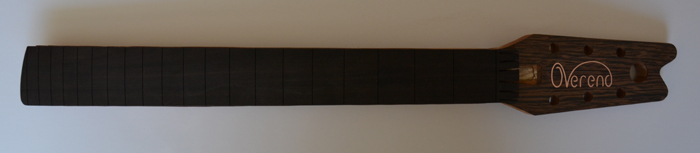 The current plan is to use a zero fret instead of a traditional nut but that may change in the near future. The bridge is shaped from the Wenge to match the head veneer and will be complemented by an aluminium tail piece as the next part of the build.  Wenge bridge.
|
|
#15
07-08-2017, 06:51 AM
|
|||
|
|||
|
This build has not progressed as I’d hoped but as today (8th July 2017) marks the 100th anniversary of the sinking of the SS Pegu I thought I’d post an update to mark the day.
I had hoped to finish the guitar today but as building guitars is just a hobby, other unexpected ‘real’ work has stolen the priority. That said, today is the first day all parts have come together to give an impression of the finished product. I still have a lot of work to do tweaking bracing, binding and generally making it look good but at least all parts are made even though nothing is actually glued together yet.  The strings will pass over the zero fret, under the aluminium SS PEGU plate and over the 'boat decking' truss rod cover on their way to the machine heads. 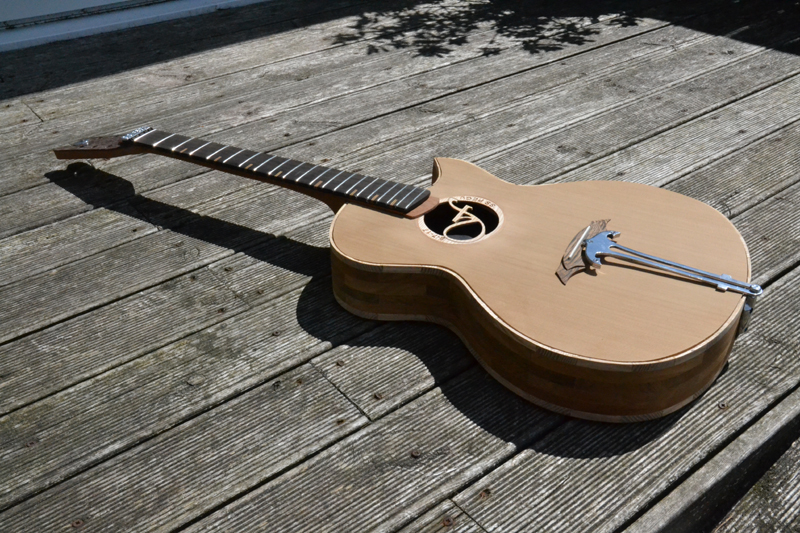   To anchor the strings I thought............. an anchor? Please note the 'hex' nut is temporary. 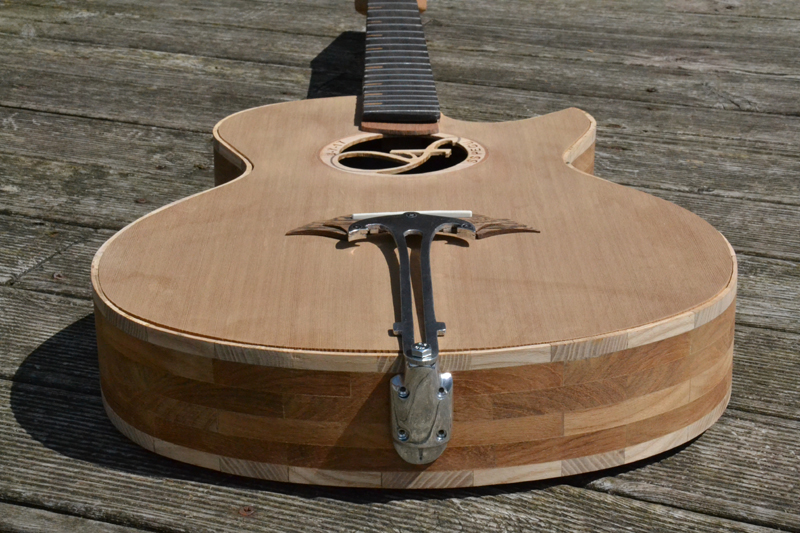 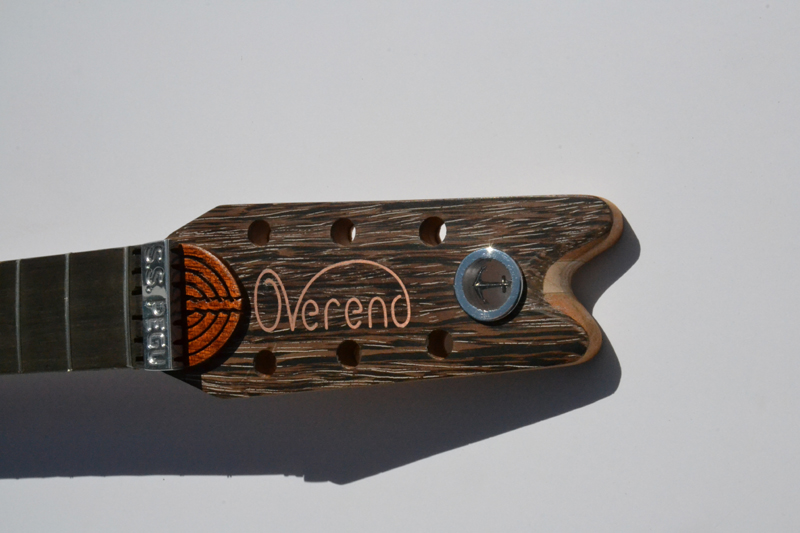 I saw these little 'anchor' thumb pins in a stationer's and could not resist. I set it in clear resin and aluminium sleeve.
|


