
|
|
#1
 02-12-2017, 02:24 PM
|
|||
|
|||
|
Hi all,
I'm relatively new around here, but just started working on my 2nd acoustic guitar and figured I'd do a build thread to share. My first build is in the finishing stages. So rather than doing a build thread for that one I'll just share all at once when its done. I don't sell guitars at all and no aspirations to do so. (Unless I win a lottery and retire early from my actual career!) I am working with a luthier, but he's not an AGF sponsor so I won't say who it is. This is basically a hobby... and it also means it will take a long time to build. I started the first guitar January of last year, and if I'm lucky it'll be done this month. With any luck this one might be done by the end of December. (Should be a bit faster 2nd time through, yes?) Anyway... on with it! Decided so far: 00 12 fret No Cutaway Figured Bubinga B&S Sinker RW top Undecided: Armrest - probably Soundhole - probably Rosette - I don't have a final design, but will be predominantly spalted maple. Bindings - Would love to hear your thoughts on binding this combination. Am currently leaning toward ebony/blackwood or something similarly dark. Though I've gone back and forth between these and maple. Here is the Bubinga B&S set.  Here is the sinker top. (obviously not the outline for the 00 I'm doing.) 

|
|
#2
02-12-2017, 03:39 PM
|
||||
|
||||
|
Very dark bindings would be cool. Alternatively, going the opposite direction with very light-colored bindings like holly, maple or ivoroid could make the top pop.
__________________
Solo acoustic guitar videos: This Boy is Damaged - Little Watercolor Pictures of Locomotives - Ragamuffin
|
|
#3
02-12-2017, 04:09 PM
|
||||
|
||||
|
As soon as I saw that top, I immediately thought of a spalted maple rosette. Then I read that's what you were considering. I think a spalted maple rosette with flamed maple bindings would look great, & be a contrast to the darker woods.
Steve
__________________
"Naturally torrified, & unnaturally horrified, since 1954"
|
|
#4
02-12-2017, 05:17 PM
|
|||
|
|||
|
Quote:
I was originally planning on doing a lutz top and bloodwood bindings... but fell in love with this top when I saw it. Unfortunately it threw out a number of other decisions so having to revisit!
|
|
#5
02-13-2017, 12:27 PM
|
|||
|
|||
|
I feel that some amount of abalone in the rosette sets a guitar apart from the ordinary. It would look beautiful on that dark top.
|
|
#7
02-13-2017, 03:38 PM
|
|||
|
|||
|
Quote:
|
|
#8
02-28-2017, 12:18 PM
|
|||
|
|||
|
Okay... finally a bit of progress. I'm already wondering if doing this as a thread is only going to re-enforce just how long this process takes when you do it as a spare time/hobby instead of a dedicated and focused effort.
Oh well... in for penny yadda yadda. I haven't gotten far as what little time I've spent were focused on the first guitar which I was hoping to have done in March... its in the finishing stages, and the only construction left is the creation of the bridge. But March may still be possible! But... for this guitar... Sides are bent and cut to size, top and back are glued together though I forgot to snap a picture of the top. Backstrip is in place. For the backstrip, I've opted to match it to the binding. I am going with blackwood bindings, so the backstrip is a blackwood with maple/rosewood/maple purfling on each side. 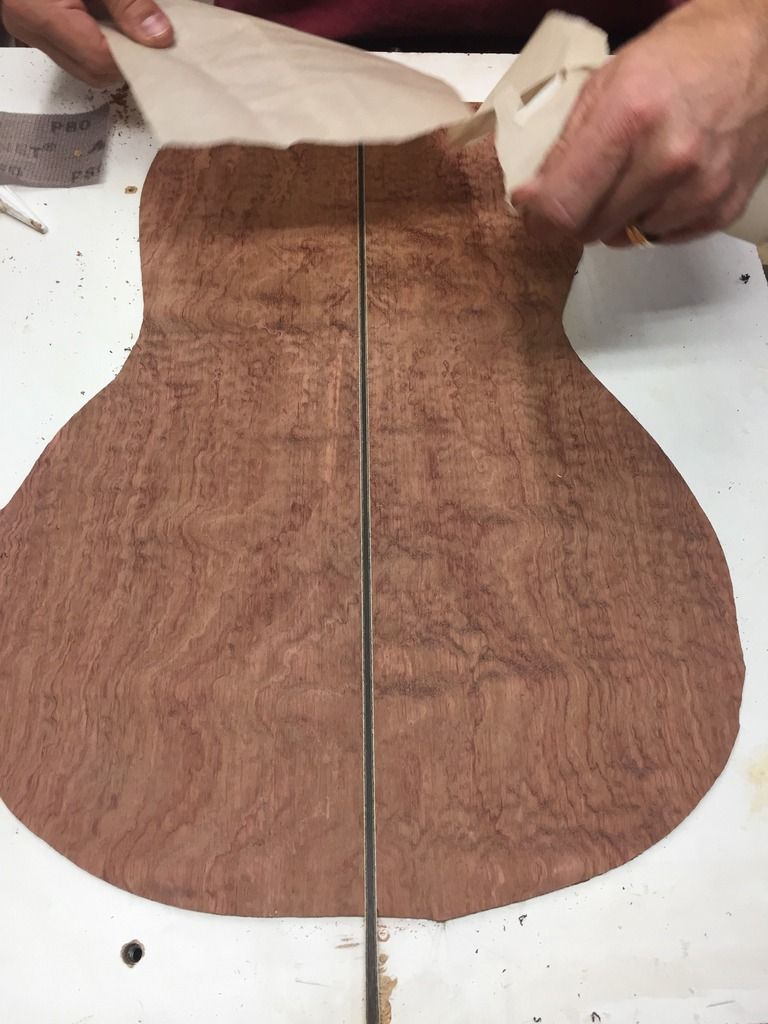 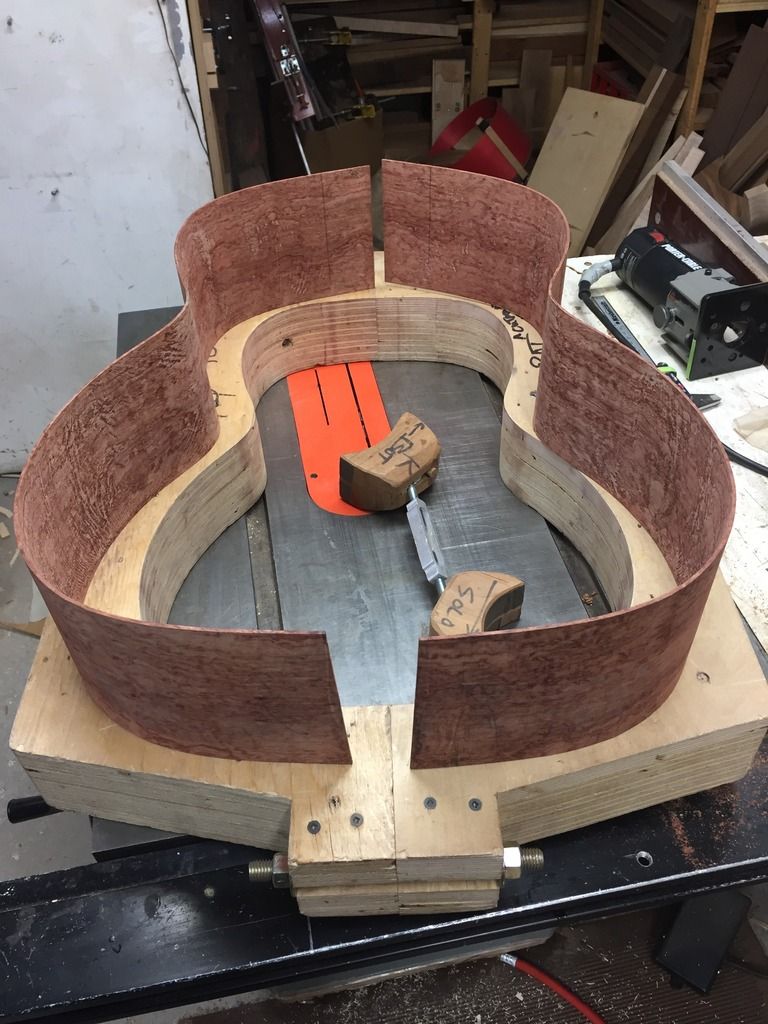
__________________
Acoustics 2001 Seagull S6 2006 Taylor GS6 2011 Fender CC-140S 2017 ZorroElite OM+ Cocobolo/Sitka (almost!) 2017/18 ZorroElite 00 Bubinga/Sinker Redwood(in progress) Electrics 2013 Gibson SG Standard 2009 Schecter Lady Luck C-1
|
|
#9
02-28-2017, 01:06 PM
|
||||
|
||||
|
Looking good so far!
|
|
#10
03-04-2017, 05:58 PM
|
|||
|
|||
|
Thanks!
I could use some input on my next decision... I will probably be doing the rosette on Monday night and I'm trying to figure out what exactly I'm going to do. I have a nice big piece of spalted maple (big enough to cut a full ring from). And originally I was thinking just doing that with some rosewood purfling inside and out. But I'm debating trying to incorporate some black MOP. Left do my own devices this pretty much end up either being either 2 black mop rings inside and outside the spalted maple... or the reverse, with 2 spalted maple rings inside and outside the black mop. Would love to hear other ideas too!
__________________
Acoustics 2001 Seagull S6 2006 Taylor GS6 2011 Fender CC-140S 2017 ZorroElite OM+ Cocobolo/Sitka (almost!) 2017/18 ZorroElite 00 Bubinga/Sinker Redwood(in progress) Electrics 2013 Gibson SG Standard 2009 Schecter Lady Luck C-1
|
|
#11
03-06-2017, 10:58 PM
|
|||
|
|||
|
Not as far as I thought I'd get tonight as I actually had to split my top and re-plane and glue. Lesson learned on double checking everything was flush before walking away.
Anyway... neck and tail blocks are glued in.  And the main ring of the rosette is cut.  I've decided that there will be a thin ring of black MOP in the centre of the spalted maple ring... with black purfling on either side. And maple/rosewood/maple/black purfling on the inner/outer edges of the maple.
__________________
Acoustics 2001 Seagull S6 2006 Taylor GS6 2011 Fender CC-140S 2017 ZorroElite OM+ Cocobolo/Sitka (almost!) 2017/18 ZorroElite 00 Bubinga/Sinker Redwood(in progress) Electrics 2013 Gibson SG Standard 2009 Schecter Lady Luck C-1
|
|
#12
03-22-2017, 09:32 PM
|
|||
|
|||
|
So... had a week off, but was back to working on this on Monday.
I don't have pictures as I didn't realize my phone was dangerously low on battery until after I was in the workshop. But, being an amateur, I figured I'd still post to share the lesson I learned (the hard way). With the sides/neck/tail blocks glued... the big task this week was cutting them to height/radiusing them. The radius line is sketched onto the sides, and tapered to flush on the neck/tail blocks first with chisels. The first guitar I did... I found the chisel to be easily the most intimating tool in the entire construction process. But this time I found that bit extremely easy. After thats done... I used a small plane to take the sides down to the radius line. This was also much easier this time around. The last step involves using a bowl with the right radius with sandpaper mounted inside to stand to the correct top radius. We call this 'driving the bus' because that's what it looks like. So... all of this was done first on what would be the back of the guitar. And it went really well. So then the same exact steps get followed for what will be the top of the guitar. Chiseling - piece of cake. No problems. Planing - piece of cake. No problems. Bus driving - Here is where things go awry. Top and back have different radii, so different sanding bowl. I'm driving the bus for about 5 minutes and everything is going well. There are 2 others working in the shop so we're chatting while we work. Suddenly there is an obvious cracking sound which silences us all, and my heart sinks because the sound has come from right in front of me. I lift the sanding bowl and am horrified to find that there is a puncture/crack/break in what will become the bass-side upper bout. Aside from the heartbreak I was feeling at that moment I was also trying to figure out how that happened... the damage was not what I'd expect to see from just sandpaper grabbing onto brittle edge. Then I see it. The sandpaper attaches to the sanding dish with a couple of countersunk bolts. And guess who never thought to double check to make sure they were tight before he started sanding? Yep... and it wasn't a little loose... it was hanging a full 1/2 inch below the sandpaper. I don't think it loosened as I worked... I just had (luckily?) managed to avoid it for the first 5 minutes. That's where my luck ran out. So... lesson learned... check the tightness of bolts on jigs/setups that could cause damage if they are loose before you start. This is also the great part about this program. The luthier came in... took one look and said: Well, that sucks... but not remotely the worst I've seen. We should be able to fix that no problem. So... we'll see. We didn't actually lose any wood, so we were able to get it glued and it looks okay. The only part that still shows visible damage is a bit that will come off anyway when we route the binding channels. I should also add that while it was a tough moment when it happened... one of the things I love about this process is that later... when the guitar is done and hopefully beautiful... I'll know all the little 'oh ****' moments that went into the construction. Oh well... despite the setback, sides are all radiuses and kerfing is bent to shape. Next week will probably be putting in the rosette, and side braces if time permits. More pictures next week!
__________________
Acoustics 2001 Seagull S6 2006 Taylor GS6 2011 Fender CC-140S 2017 ZorroElite OM+ Cocobolo/Sitka (almost!) 2017/18 ZorroElite 00 Bubinga/Sinker Redwood(in progress) Electrics 2013 Gibson SG Standard 2009 Schecter Lady Luck C-1
|
|
#13
03-28-2017, 09:37 AM
|
|||
|
|||
|
I know not a lot of folks following this thread which is fine... its serving as my build journal!
I'm a bit frustrated... I only actually work on this for about 3 hours a week. And when you are dividing time between 2 guitars its painfully slow. But I'm really trying to remember to take pictures as I go. Last night I made very little progress on this guitar. Kerf is glued on one side leaving spaces for the braces.  I also have the spalted maple portion of the rosette glued in though I realize that I changed my mind on the orientation after taking this picture.  The rest of my night was spent wet sanding the first guitar... it looks so amazing I'm dying to get it done... but we're racing to get the box done on guitar number 2 before we start running into humidity issues.
__________________
Acoustics 2001 Seagull S6 2006 Taylor GS6 2011 Fender CC-140S 2017 ZorroElite OM+ Cocobolo/Sitka (almost!) 2017/18 ZorroElite 00 Bubinga/Sinker Redwood(in progress) Electrics 2013 Gibson SG Standard 2009 Schecter Lady Luck C-1
|
|
#14
03-29-2017, 05:51 PM
|
|||
|
|||
|
That's looking really nice! Good choice on the dark bindings. You caught my eye when I saw "bubinga". After I sold my D-18 in the late 80's, I was without a guitar for a few years. My plunge back into guitar playing was with an Ibanez with bubinga b&s, and although it was mediocre sounding, my wife and I both loved the looks of it. It's now long gone, but I've often wondered how a really nicely made guitar would look and sound when built from bubinga. I will keep watching your progress. Thanks for sharing!
__________________
2005 Larrivee D-03E Sitka/Mahogany 2014 Santa Cruz OM/PW Sitka/Rosewood 2015 Breedlove Masterclass Concert Engleman/Myrtle 2018 Larrivee Custom OM-10 Rosewood/Alpine Moon Spruce/Torch inlay 2018 Taylor 524ce LTD NAMM Show all-walnut
|


