
|
|
#91
 09-24-2017, 07:16 PM
|
|||
|
|||
|
I may be wrong buy I think apple is harder than Cherry. I've got an apple log that I'm having sawn into lumber.

|
|
#92
09-25-2017, 12:22 PM
|
|||
|
|||
|
I'm coming late to this one, and only looked at a few posts early and late.
I've built one guitar of apple wood, although I've used some for other things. The stuff in the guitar was a lot softer than much of what I've gotten, and may not be representative. It bent really well, twice. I took the sides to a local craft fair as a demo; it's one of the few things you can do outdoors in August. Besides, if you come in the morning with a flat set of sides, with the blocks and liners ready and a mold to assemble them all in, and do the bending by hand you can make quite a good demo of it. People don't usually know how they get that shape. Anyway, when I got there I found I'd left my turnbuckles (for holding the side tight in the mold) at home, I was able to prop them in with a length of dowel to do the profiling, but for some reason left them out on the bench at the fair over night. It was humid, and the next morning when I came back they were flat again. Two demos for the price of one. My violin making teacher made at least one apple viola, after determining that it had properties that were close to that of soft maple. We compared it with a bunch of others with different woods, and it was one of the nicer ones.
|
|
#93
09-26-2017, 05:09 AM
|
|||
|
|||
|
Quote:
This Cherry has worked great so far and to be honest I cant imagine an easier wood to bend and work with.
|
|
#94
09-26-2017, 07:31 PM
|
|||
|
|||
|
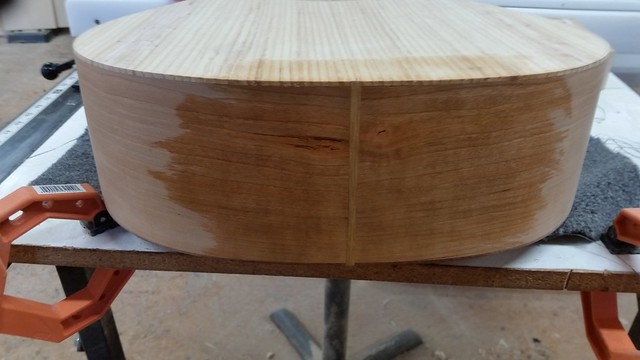
I got a little more done today. I got the back braces shaped, also the braces and center strip trimmed to the correct lengths. Got the Kefed Linings notched to accept the braces and got the back glued in place. Hopefully there isn't too much glue squeeze out on the inside sides. I am hoping for a clean look inside. I'm Going to try to get time to trim the back flush with the sides tomorrow.
Got to admit that I am a little intimidated buy cutting the notch for the bindings though. Dread that part a little.  20170926_182646 by Cabinet Man, on Flickr 20170926_182646 by Cabinet Man, on Flickr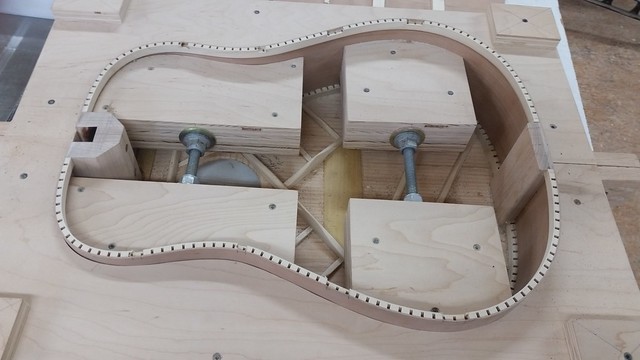 20170926_101611 by Cabinet Man, on Flickr 20170926_101611 by Cabinet Man, on Flickr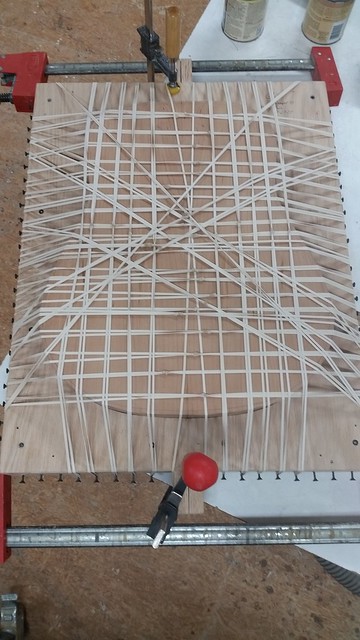 20170926_185432 by Cabinet Man, on Flickr 20170926_185432 by Cabinet Man, on Flickr
|
|
#95
09-26-2017, 07:40 PM
|
|||
|
|||
|
Congratulations! You have a box! If you thought notching the kerf for brace inlets was daunting then I wont say anything about routing binding channels. Go forth but proceed with caution! I need to remind myself that routers are like hurricanes, rotating engines of potential destruction.
__________________
(2006) Larrivee OM-03R, (2009) Martin D-16GT, (1998) Fender Am Std Ash Stratocaster, (2013) McKnight McUke, (1989) Kramer Striker ST600, a couple of DIY builds (2013, 2023)
|
|
#96
09-27-2017, 02:38 PM
|
|||
|
|||
|
OK, So I now have a box. Will post pictures later.
Help me Understand neck angle a little better. So I put the neck to the body and lay the fret board onto the neck and body. Everything works out perfectly flat on the fret board laying on the neck and body. When laying a straight edge on the fret board, If I measure approx. where the back of the bridge will be located I have a 1/4" gap with no frets in the fret board. I know earlier that several of you all said that I should shoot for having 1/2" at that location. We have two other acoustics ( neither one expensive by any means) in the house and I measured both of those , again laying a straight edge down the fret board up to the bridge location and both of those have 5/16" height at the bridge between the guitar top and the bottom of the straight edge. The actual string height for both is right at 1/2" though. Not disagreeing at all, because I don't have any knowledge of how this is all supposed to work out, but I don't understand why this guitar should be different from the other 2 acoustics that we have. Once again any advice is much appreciated.
|
|
#97
09-27-2017, 05:59 PM
|
|||
|
|||
|
Quote:
Charles Tauber will doubtless be along shortly and will explain everything with his usual crystal clear clarity.
|
|
#98
09-28-2017, 10:37 AM
|
|||
|
|||
|
Quote:
You do use the straightedge to evaluate the neck angle when you get to setting the neck, but you're not quite there yet. The neck needs to be perfectly flat so that the straightedge is touching all the frets, and it should just touch the top of the bridge. There's a bit of variability there, because that distance is based on an estimate of how much the top will distort under string tension. You could do a preliminary check before you install frets, and the straightedge would hit the bridge about the height of the fret below the top of the bridge. At this point, all you can be sure of is that you're in the ballpark.
__________________
Rodger Knox, PE 1917 Martin 0-28 1956 Gibson J-50 et al
|
|
#99
09-28-2017, 04:11 PM
|
|||
|
|||
|
Quote:
No I didn't Remove the strings, Just laid the straight edge down the middle of the fret board. I think my neck angle is gonna be ok. I did have to tweak the shoulder of the neck to get my fret board perfectly centered with the center of the top though. Good to go now. Will post some updated pictures soon as I can get time. Thanks again.
|
|
#100
10-02-2017, 06:36 PM
|
|||
|
|||
|
Well, since my last post I've got a few things accomplished on my build.
I got the back routed flush with the sides, got the holes drilled in the neck for the mounting nuts, the fret board glued to the neck, The neck is now mostly shaped and fitted to the sides and top. Still got a little to do on it yet. I still have to rout for the bindings, I've been dreading that and have put it off as long as possible. LOL I now know what everyone was talking about as far as getting the the neck angle set and using wedge under the front of the fret board if needed. I did end up having to put a wedge under the fret board to keep it from nose diving and flat on the soundboard. I believe my angle is going to end up being ok. Carving the neck wasn't hard but was very time consuming. Just took my time and enjoyed it. I worked on that and fitting the neck to the body all day. But I got the neck to where I love the way it feels now. Got to finish up at the head stock tough when I get more time. 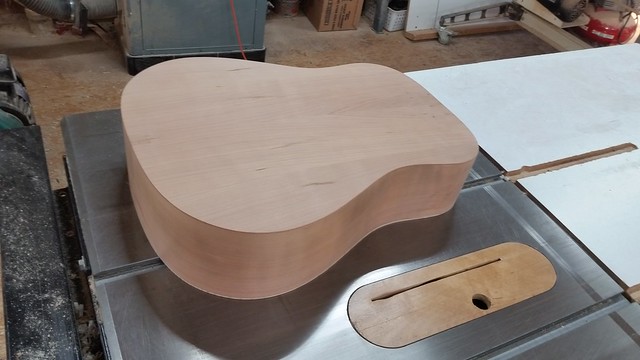 20170928_083213 by Cabinet Man, on Flickr 20170928_083213 by Cabinet Man, on Flickr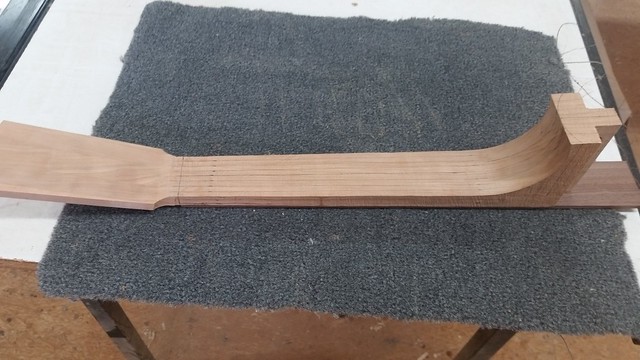 20171002_090832 by Cabinet Man, on Flickr 20171002_090832 by Cabinet Man, on Flickr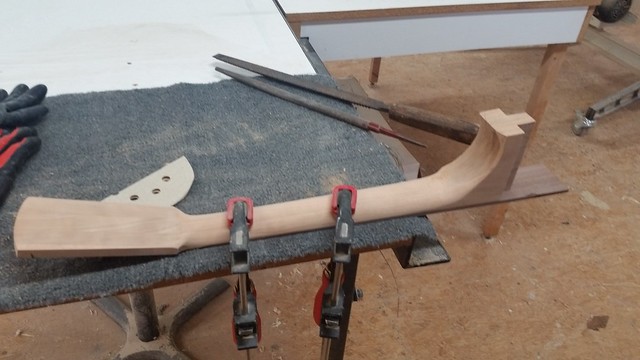 20171002_105338 by Cabinet Man, on Flickr 20171002_105338 by Cabinet Man, on Flickr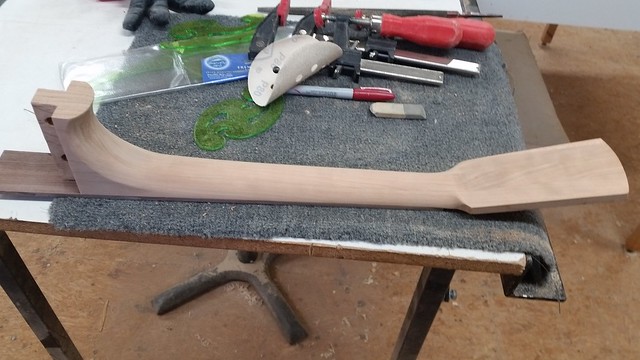 20171002_121732 by Cabinet Man, on Flickr 20171002_121732 by Cabinet Man, on Flickr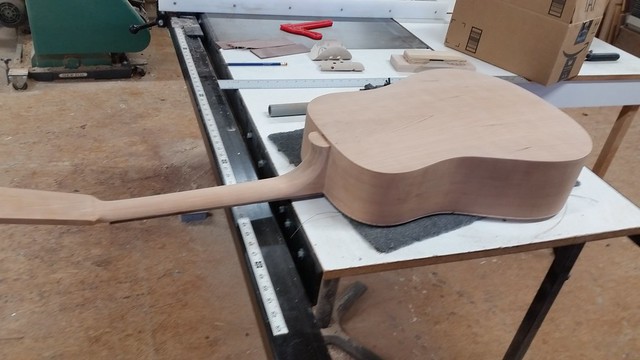 20171002_160840 by Cabinet Man, on Flickr 20171002_160840 by Cabinet Man, on Flickr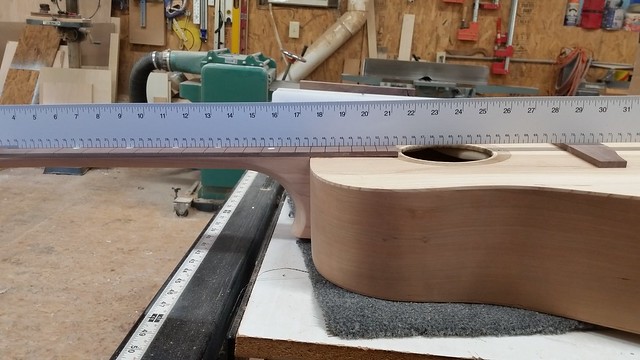 20171002_163407 by Cabinet Man, on Flickr 20171002_163407 by Cabinet Man, on FlickrAs far as bolt on necks are concerned; Do most of you end up gluing the fret board to the sound board once you are ready to permanently bolt on the neck? Last edited by CabinetMan; 10-02-2017 at 06:49 PM.
|
|
#101
10-03-2017, 08:06 AM
|
|||
|
|||
|
Yes, glue the fingerboard extension. With a bracing pattern like this where there's a gap between the headblock and upper transverse brace, the extension is part of the soundboard bracing.
|
|
#102
10-03-2017, 10:46 AM
|
|||
|
|||
|
Quote:
|
|
#103
10-03-2017, 12:42 PM
|
|||
|
|||
|
I used to use a razor saw and a chisel to do the brace end lining pockets. If you leave the brace ends really long so they stick out of the cut out outline of the back it makes marking them on the linings a snap. In any case when you marke them use a razor saw to cut the lines out to the approximate depth. I usually never cut into the sides but if you are going to have binding, which who doesn't, then it really doesn't matter. But once cut then use a small chisel to remove the waste. Today I have found a Dremel with a dental sized rabbet bit is much faster and accurate. So I cut the lines with the razor saw then set the Dremel to the right depth and remove the waste. A dial gauge caliper is a great tool to mark out depths.
As for neck angle, that's almost always the most tricky thing for a first time builder, in fact even after many guitars some people don't quite understand it. It's not hard though. Cumpiano and Natelson's method works very well. IN short what you do is this: In their book the fretbaord is glued to the neck and is fretted. Then take a straight edges down the center of the fretboard till it hovers right over the saddle location over the bridge. The airspace over the bridge should be no more then 1/16th inch and no less then level or even better about 1/32nd inch above. I don't fret till the very end so I just add the fret height measurement in. In the end you should end up with perfect bridge system. That is, the string height over the soundboard at the bridge of 1/2in and a saddle that protrudes a standard 3/8th inch bridge by about 1/8th or a bit more. It pretty much works well every time. So... Having said that, if you have not already accounted for the neck angle in your body design then you will probably have to deal with the area of fretbaord extension over the body. In most cases once you get the neck angle right you will probably notice that you have the neck angle back set such that there is airspace under the fretboard extension over the top. If so then don't be tempted to just clamp it and glue it down because you will have the dreaded body joint hump in the profile of the fingerboard plane. Instead you will need to make a wedge to fill in that airspace. IF the opposite occurs which is unusual then you will have to glue down the fretbaord extension and then plane every thing in line. The goal is to have a perfectly flat plane from the nut all the way to the saddle. If you sight it like you are shooting a rifle it should be dead flat. Fall away is another concept some people like but I don't personally, I like flat. Then of course you can dial in relief in your final setup.
|
|
#104
10-03-2017, 07:12 PM
|
|||
|
|||
|
Redir,
Thanks for the reply. When I did the brace pockets I did similar to what you did. I had excess sticking out on the braces. I marked them and I actually cut all the pockets using only a Dremel installed in a router base with a 1/8" bit. Very easy to cut the pockets with a consistent depth that way. I learned a lot about the neck angle by doing this guitar. I want to thank You and EVERYONE who posted and gave me a heads up on neck angle and supporting the end of the fret board if needed. That helped me out a BUNCH. I have my fret wire ordered and will try to get it installed this weekend. I think everything will work out much like you described. Trying to think ahead a little and I'm starting to think about what type of finish to go with on this guitar. Considering going with a Satin or semi-gloss finish for this. Also Thinking about using Curly Maple and Walnut for Purfling and Binding for the body. I'm wanting to spray a wash coat and some dye stain on the cherry to make it pop a little and to have a nice even color to it. Hopefully I can a get the walnut and maple taped off good enough so it doesn't get on it but that shouldn't be a problem by spraying the dye. Got a lot to do yet before getting to that point though. Last edited by CabinetMan; 10-03-2017 at 07:26 PM.
|
|
#105
10-04-2017, 07:00 PM
|
|||
|
|||
|
I got the end strip in today. Made it out of Wormy Chestnut but I'm not entirely happy with it so I may end up cutting it out and putting in a piece of Curly Maple. Got the dreaded Binding slots routed and they turned out good. Was also going to go with Wormy Chestnut for the Purfling and Curly Maple for the binding but the Chestnut too closely matches the color of the top. So I now believe I'll go with Cherry for the Purfling. I also found a great piece of Curly Maple that I cut my bindings out of.
 20171004_130627 by Cabinet Man, on Flickr 20171004_130627 by Cabinet Man, on Flickr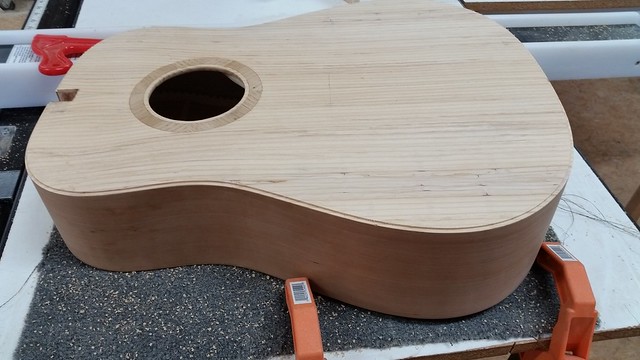 20171004_133206 by Cabinet Man, on Flickr 20171004_133206 by Cabinet Man, on Flickr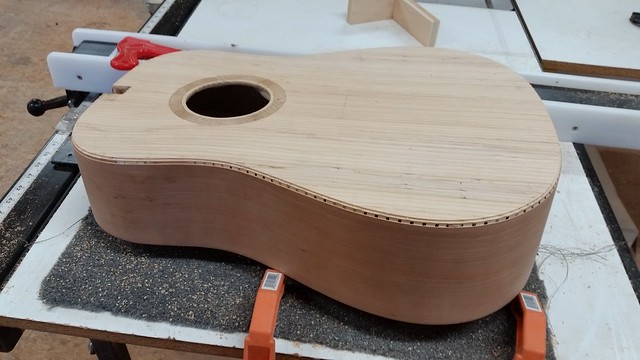 20171004_135044 by Cabinet Man, on Flickr 20171004_135044 by Cabinet Man, on Flickr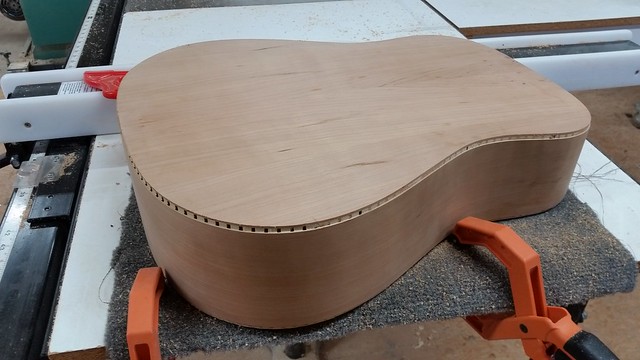 20171004_160822 by Cabinet Man, on Flickr 20171004_160822 by Cabinet Man, on Flickr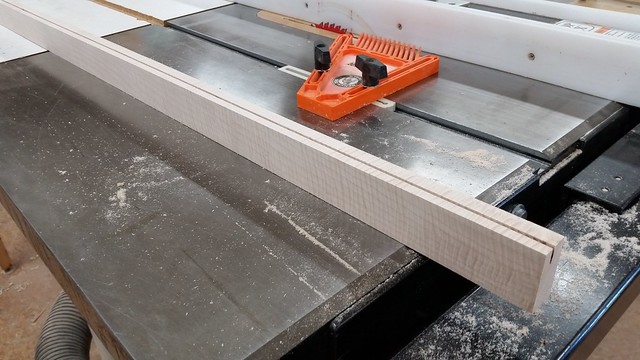 20171004_164333 by Cabinet Man, on Flickr 20171004_164333 by Cabinet Man, on Flickr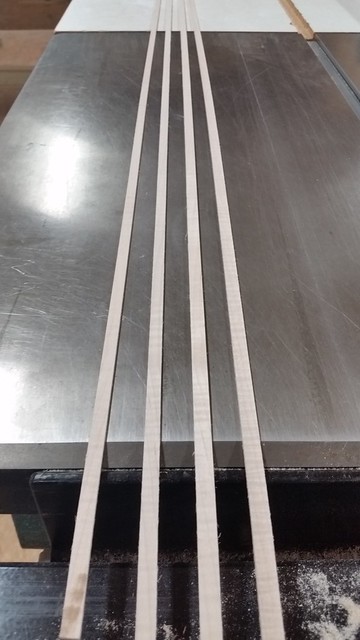 20171004_182926 by Cabinet Man, on Flickr 20171004_182926 by Cabinet Man, on Flickr
|


