
|
|
#1
 08-22-2017, 08:38 PM
|
|||
|
|||
|
It's been a little while since I've posted any of my builds here on the forum. But with the upcoming Woodstock festival, and a new collaboration with The North American Guitar (TNAG), I thought it would be appropriate to start this thread to show what I'm working on. I'm excited about what I have in the works, and hope that you enjoy the thread. I'm already a number of weeks into the builds so I'll catch you up quickly.
But first, I have to say that I can't wait for October! I have been wanting to get into the Woodstock show for a couple of years, and this is the year. Mainly, I just can't wait to be in a room with so many great guitars, and builders. I was a part of the Memphis show in 2015, and had a blast. What an inspiring place to be. I've heard great things about Woodstock, and I'm sure it won't disappoint. Also, I'm very grateful and excited to be building two guitars for TNAG. I will be showing both guitars at the Woodstock festival, along with a third guitar which I plan on offering for sale directly at the show. The first guitar is an RL15+ model, with Cuban mahogany back and sides and Swiss moon spruce top. In case you're wondering, the RL15+ is a slightly larger version of my RL15 model. It's 3/8" wider at the lower bout (15.5"), 3/8" longer (19.75"), and 1/8" deeper at the end block (4.625"). I've always been happy with the shape of the RL15, but I wanted to build something that landed halfway between an OM and larger bodied instrument. So there it is, same shape, just a little more cubic inches in the soundbox. Here are a few pics of my progress so far: The back plate with Honduran mahogany braces tuned and ready to go. On a bit of a whim, I decided to go with some curly maple for the center reinforcement strip, which started me down a design path from which I haven't gotten off, yet. I think you'll see as the build unfolds. [IMG]  IMG_3976 by ryan gerber, on Flickr[/IMG] IMG_3976 by ryan gerber, on Flickr[/IMG]The side assemblies for both TNAG guitars ready for the back and soundboard. [IMG]  IMG_3971 by ryan gerber, on Flickr[/IMG] IMG_3971 by ryan gerber, on Flickr[/IMG]Here I'm getting the back in perfect position before marking the location of the braces. [IMG]  IMG_3974 by ryan gerber, on Flickr[/IMG] IMG_3974 by ryan gerber, on Flickr[/IMG]Back glued in place and sealer coats of shellac applied to the inside. Actually, I use shellac on the sides, and then a satin lacquer for the back once it's attached. I've found that I like the way the lacquer lays flat, and more consistent than the shellac. Also, I'm sure someone will be curious about the neck block. I was inspired a few years ago by Burton Legeyt, and his thinking on the construction of the neck block. To my mind, it made complete sense to bring the sides of the block further out, in order to reduce the amount of twist in the sides. With the solid linings and three ply sides, by rim assemblies are already very rigid, and this just another part of the equation. I also very much like the added support to the back that the bottom foot of the block provides. [IMG]  IMG_4028 by ryan gerber, on Flickr[/IMG] IMG_4028 by ryan gerber, on Flickr[/IMG]Once the back and sides are joined, I start on the rosette. For this guitar, I had something a little different in mind from the beginning. A while back I happened upon a large (about the size of a large potato) chunk of dried overspray from a local cabinet shop. I knocked it off of one of their spray carts. I'm not sure how many years it had been building, but my guess is more than five. I could see on the outside of the block that there were all sorts of interesting lines and colors from the many kitchens that had been sprayed over the years. I took it home, cut it open, and found some really interesting colors and patterns. As I started planing for this Mahogany guitar, it came to mind that the blues, greens, browns, and whites in the paint could be a good match for the mahogany. So here was my first sketch, and a few of the slabs of layered paint. [IMG]  IMG_4036 by ryan gerber, on Flickr[/IMG] IMG_4036 by ryan gerber, on Flickr[/IMG]Obligatory romantic shot of planing the soundboard. The soundboard for this guitar is on the left. [IMG]  IMG_4004 by ryan gerber, on Flickr[/IMG] IMG_4004 by ryan gerber, on Flickr[/IMG]And fast forward to the almost finished rosette and soundboard with binding...I still need to add a few small details to the rosette to cover up that center seam in the bottom that I in no way planned for. It took some careful execution, but many of the joints between the sections of paint lined up very well. Some of them so well that you can't tell there is a joint. But lo and behold, the two that were most visible both ended up just slightly off center of the center line of the guitar. Even weirder yet, I wasn't trying to locate the joints at any particular location. I just took the lengths as they came. So the fact that they both ended up at 6:00 was pretty weird. My wife quickly pointed out the mistake, which made me realize it wasn't an option to leave it as is. However, this could end up leading to a nice design idea elsewhere on the guitar. It will require some more thinking, but as it stands it could end up being a nice, subtle touch. [IMG]  IMG_4118 by ryan gerber, on Flickr[/IMG] IMG_4118 by ryan gerber, on Flickr[/IMG]Next up is the binding and end graft. When I did the center strip in the back, (the dark strip with maple purfling), the idea came to me to marry the maple purfling with the binding. Usually, as is the case for me and most other builders as far as I know, if there are contrasting lines on the outside of the center strip, they continue on around the inside of the binding and become purfling. But in this case, I wanted the maple lines on the outside of the center strip to marry with the binding, and let the dark center strip go though the end of the guitar, and continue on to the end graft. I hope this makes sense. The picture should help. I'd like to say, if it's okay, that the joinery here was a fun challenge, and I'm quite please with the result. [IMG]  IMG_4063 by ryan gerber, on Flickr[/IMG] IMG_4063 by ryan gerber, on Flickr[/IMG][IMG]  IMG_4066 by ryan gerber, on Flickr[/IMG] IMG_4066 by ryan gerber, on Flickr[/IMG] IMG_4067 by ryan gerber, on Flickr IMG_4067 by ryan gerber, on Flickr[IMG]  IMG_4074 by ryan gerber, on Flickr[/IMG] IMG_4074 by ryan gerber, on Flickr[/IMG][IMG]  IMG_4072 by ryan gerber, on Flickr[/IMG] IMG_4072 by ryan gerber, on Flickr[/IMG]Cutaway binding. [IMG]  IMG_4120 by ryan gerber, on Flickr[/IMG] IMG_4120 by ryan gerber, on Flickr[/IMG]Opps....I've used up all my allotment for text. I'll continue on the next post.
__________________
Ryan Gerber 
|
|
#3
08-22-2017, 08:46 PM
|
|||
|
|||
|
At this point, the body is complete and it's on to the neck. All the maple on this guitar is something really different for me. I have always tended to go with darker binding. But for some reason, the curly maple was just calling out to me. So I went with the maple on the binding and other details. The problem is that I really came to like it. So now that I'm in the neck making mode, I just couldn't resist the idea of using curly maple for the neck. On top of that, I decided to try to continue the taper of the center strip in the back, all the way through the neck. It goes from .25" to .125" on the back, and it turns out that this taper worked perfectly for the length of the neck. Here is a pic of the rough neck blank, glued up with the top surface trued.
[IMG]  IMG_4106 by ryan gerber, on Flickr[/IMG] IMG_4106 by ryan gerber, on Flickr[/IMG]And here is a shot of the back of the guitar with the neck attached. It may be a little difficult to see the gradual taper in the picture, but it's there. From about .25" at the bottom of the guitar to .020" at the end of the headstock. [IMG] 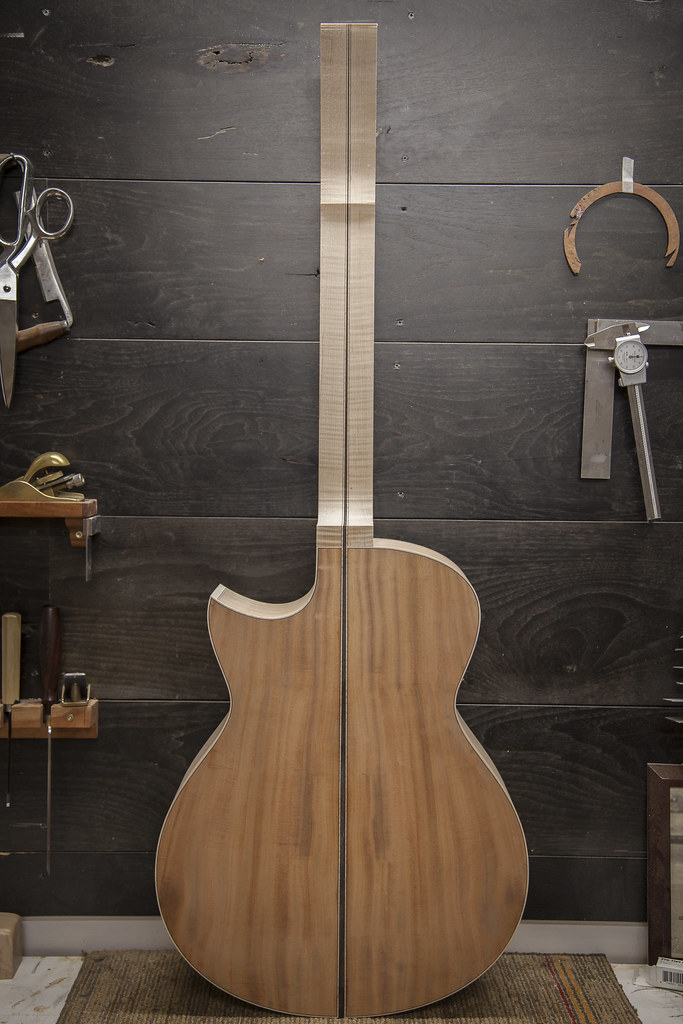 IMG_4113 by ryan gerber, on Flickr[/IMG] IMG_4113 by ryan gerber, on Flickr[/IMG]I managed to get the dark strip in the neck to line up just right with the body, which gives me the opportunity to do something interesting with the heelcap. I'm considering putting a cap of some kind on each side of the center strip, or just leaving it as is with no heel cap at all. What do you think? [IMG] 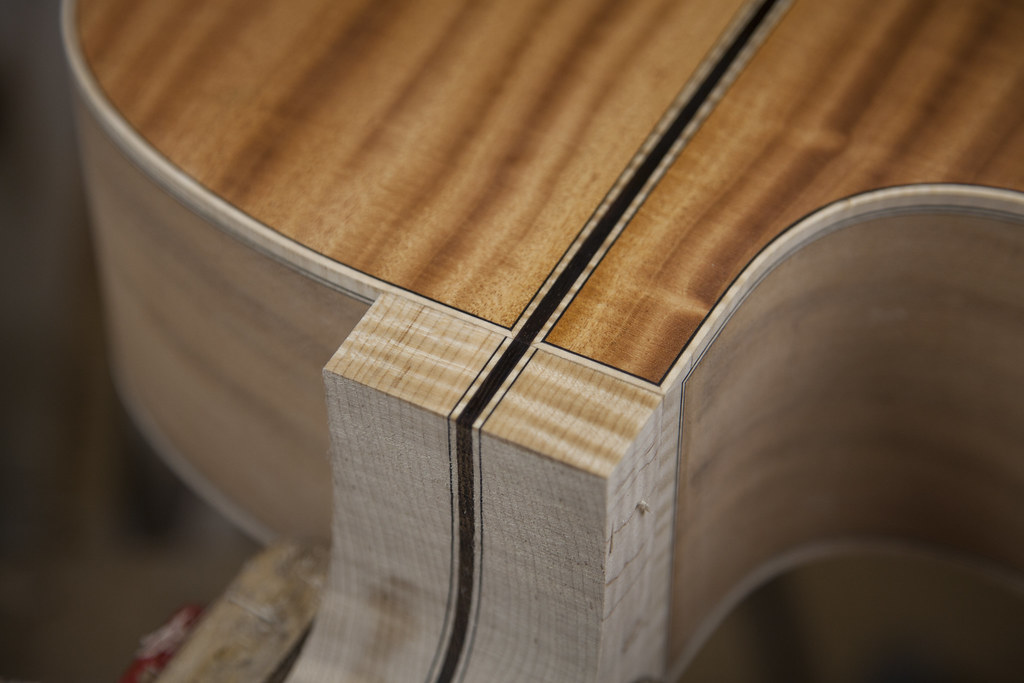 IMG_4109 by ryan gerber, on Flickr[/IMG] IMG_4109 by ryan gerber, on Flickr[/IMG]This is the extent of my progress so far on this guitar, so I'll end here for the night. It's getting to be past my bedtime anyways. And my eyes are starting to hurt. Tomorrow, I plan on working on the rosette for the second guitar for TNAG, which is an RL15 model, with Macassar ebony back and sides and Swiss moon spruce top. I'm not sure which guitar I will be spending more time on in the coming days, but I will update my progress either way. Thanks for watching! Here is a quick parter shot of the second guitar, with the sides and back together. [IMG]  IMG_4031 by ryan gerber, on Flickr[/IMG] IMG_4031 by ryan gerber, on Flickr[/IMG]
__________________
Ryan Gerber
|
|
#4
08-22-2017, 09:06 PM
|
||||
|
||||
|
Super clean stuff as always Ryan. That rosette is wild. Nice use of material.
|
|
#5
08-23-2017, 06:34 AM
|
||||
|
||||
|
Beautiful and tasteful as usual Ryan...Awesome!
|
|
#6
08-23-2017, 07:10 AM
|
||||
|
||||
|
Quote:
Really sweet work! Steve
|
|
#7
08-23-2017, 07:30 AM
|
||||
|
||||
|
Quote:
Who is #230 in the background? My AMA number was 300 above that number, many, many, many moons ago 
|
|
#8
08-23-2017, 10:19 AM
|
|||
|
|||
|
Quote:
__________________
Ryan Gerber
|
|
#9
08-23-2017, 10:24 AM
|
|||
|
|||
|
Quote:
The picture in the background is of my Dad back in the 70's. He raced for one year, and so he tells me, won every race. He's been a motorcycle mechanic his whole life, and still has his own shop at the age of 65, or thereabouts. I grew up riding dirt bikes in the Mojave desert in California, and motorcycles were a big part of my childhood. I keep his picture in my shop to remind myself that it's possible to be self employed.
__________________
Ryan Gerber
|
|
#10
08-23-2017, 10:26 AM
|
|||
|
|||
|
Quote:
__________________
Ryan Gerber
|
|
#11
08-29-2017, 06:51 PM
|
|||
|
|||
|
This week I decided to get back onto the Macassar ebony guitar, and finish up getting the soundbox together. Rosette was completed, top was braced, and then glued to the sides. Here is a shot of the front. Not sure if you can see the rosette well enough, but the brown rings are cocobolo, which will coincide with the binding, and they are bordered by curly maple which will match the purfling on the body. The main light colored piece is birdseye maple.
[IMG]  IMG_4142 by ryan gerber, on Flickr[/IMG] IMG_4142 by ryan gerber, on Flickr[/IMG]Taking a step backwards in time, here are some pics of earlier in the build. Laminating sides - I've tried different methods for laminating sides, but found that this works best for me. It's also very versatile, because you are working from the outside border of the body shape, towards the inside. This allows me to vary the thickness of the sides, depending on how thick or stiff I want them to be, without having to make different molds to accommodate the varying thicknesses. It also allows me to laminate my linings ( i use solid linings instead of kerfed linings), on the same form. I use the sides as the caul, under the lining laminations, and the linings end up fitting the sides perfectly. Okay, enough about that! [IMG]  IMG_3868 by ryan gerber, on Flickr[/IMG] IMG_3868 by ryan gerber, on Flickr[/IMG][IMG]  IMG_3872 by ryan gerber, on Flickr[/IMG] IMG_3872 by ryan gerber, on Flickr[/IMG][IMG]  IMG_3875 by ryan gerber, on Flickr[/IMG] IMG_3875 by ryan gerber, on Flickr[/IMG]Here is the rim assembly with the back in place. [IMG]  IMG_4026 by ryan gerber, on Flickr[/IMG] IMG_4026 by ryan gerber, on Flickr[/IMG]Tomorrow I'll continue working on the binding, purfling, and end graft, in order to finish up the soundbox. That should take about 1.5 days, then it's neck time! I always feel a sense of relief once I reach the neck side of things, because it feels downhill from there. I'll also be working on the neck for the mahogany guitar.
__________________
Ryan Gerber
|
|
#12
08-29-2017, 06:54 PM
|
|||
|
|||
|
Here is pic of the full end graft for the mahogany guitar. I forgot to include it in the first post. I like that it's simple, but unique in the way that it's executed.
[IMG]  IMG_4145 by ryan gerber, on Flickr[/IMG] IMG_4145 by ryan gerber, on Flickr[/IMG][IMG] IMG_4072 by ryan gerber, on Flickr[/IMG]
__________________
Ryan Gerber
|
|
#13
08-29-2017, 10:04 PM
|
|||
|
|||
|
Great work Ryan I love the binding and the purflings with perfect miters. I also like what your doing structurally with the headblock and the linings. Keep it up!
|
|
#14
08-30-2017, 08:58 AM
|
|||
|
|||
|
Super cool rosette on the latest top!
And the endgraft--carrying it through into the backstrip is an elegant masterpiece. Very cool as well...
__________________
2013 Stehr Auditorium (Carpathian/Myrtle) 2015 Stehr Auditorium (Adi/BRW) 2020 Baranik Meridian (Blue Spruce/Manchinga) 2020 Wilborn Arum (Tunnel 14/Coco) 2021 Kinnaird Graybeard (BC Cedar/Bog Oak) 2022 Kinnaird CS Student Build (Adi/Padauk) 2023 Kinnaird FS (Italian/Koa)
|
|
#15
08-31-2017, 06:49 PM
|
|||
|
|||
|
Quote:
__________________
Ryan Gerber
|


