The Acoustic Guitar Forum

Go Back   The Acoustic Guitar Forum > General Acoustic Guitar and Amplification Discussion > Build and Repair

Reply
 
Thread Tools
  #16  
Old 12-07-2012, 10:39 PM
ZekeM ZekeM is offline
Registered User
 
Join Date: Jun 2012
Location: Cross Plains, TN
Posts: 1,207
Default

Quote:
Originally Posted by charles Tauber View Post
Quote:
Originally Posted by ZekeM View Post
The current issue also has this complicated pinned joint.
I'm not sure who "invented" the pinned joint for guitar necks, but it was used extensively by Gurian "back in the day". I can't really see any reason that one would use that now given the changes/advances in neck joining and technology since then, but, I suppose the same could be said for Spanish foot/heel construction. Lots of different methods...
Interesting bit of history Charles.

I'm with you on the fact that the pinned neck has gone out of style. I guess you may have a few people set in their ways or trying to replicate the exact instruments of days gone by that still use this method. Other than those two reasons I can't see why anyone would want to go to the trouble of it. Unless they just like a challenge
Reply With Quote
  #17  
Old 12-07-2012, 10:42 PM
Ben-Had Ben-Had is offline
Registered User
 
Join Date: May 2010
Location: Creedmoor, NC
Posts: 524
Default

I didn't over simplify anything. The concept was complimentary angles equaling 180*. Doesn't matter if it's 91* + 89* = 180* or 91.3* + 88.7* = 180*. If he measures the angle formed by the top of the neck and heel cheek and subtracts 180 he'll get the complimentary angle he needs on the top to get a good neck set. OP said "setting the neck is really complicated to me." Seems to me he was looking for a simple answer. I gave him one. And I would venture to say most builder use the same concept.
__________________
Tim B
Reply With Quote
  #18  
Old 12-07-2012, 11:52 PM
charles Tauber charles Tauber is offline
Registered User
 
Join Date: Feb 2011
Posts: 8,381
Default

Quote:
Originally Posted by Ben-Had View Post
I didn't over simplify anything. The concept was complimentary angles equaling 180*.
Well, let's just say that you presented one method of doing it.

Quote:
Doesn't matter if it's 91* + 89* = 180* or 91.3* + 88.7* = 180*. If he measures the angle formed by the top of the neck and heel cheek and subtracts 180 he'll get the complimentary angle he needs on the top to get a good neck set.*
And this is the part you are not understanding. Where does the 89 or 88.7 come from? Suppose the heel cheeks are 89.5 degrees, will that work? How about 88 degrees, will that work? Will it only work with 89 or 88.7 degrees? How does one select the desired angle and its complement?

You are providing a formula, rather than the goal underlying the formula. The formula works within a relatively small range - it isn't just ANY complementary angles. Let me illustrate the point via exaggeration.

Suppose you choose 45 degrees for the heel cheek. The complement is 135, by definition forming 180 degrees. The fingerboard will lie nice and flat along the top of the neck and continue without discontinuity along the surface of the top. What will be the string height above the top at the bridge/saddle resulting from this set of complementary angles? Think archtop guitars.

What the complementary angles formula does is ensure that there is no discontinuity between the plane of the neck and the plane of the top in the region of the top to which the fingerboard is glued. The angles used are what is necessary to produce a desired string height. Using 91/89 will give a different string height than, say, 90/90 or 89/91. You can use the tail to wag the dog, but only within a narrow band of values. It works practically, but in using it, ideally, one shouldn't loose sight of what one is trying to achieve - a desired string height at the bridge.

Achieving 88.7 degrees is another issue (and discussion) all together.

Quote:
And I would venture to say most builder use the same concept.
Some do, some don't. That was my point. Three people in this thread alone have given a method different than the complimentary-angles approach you presented.

Last edited by charles Tauber; 12-08-2012 at 12:45 AM.
Reply With Quote
  #19  
Old 12-08-2012, 06:57 AM
nate clark nate clark is offline
Registered User
 
Join Date: Aug 2006
Posts: 142
Default

Quote:
Originally Posted by dreadsftw! View Post
ok so if the bridge is 5/8 inches thick how to i find my neck angle from that?
Hey, I'm just a repair guy, but I do deal with adjusting neck angles pretty often. For a steel string flat top you want the top of the frets and the top of the bridge to be in the same plane. So a really long straightedge lying flat ontop of the frets on a straight neck will just barely touch the top of the bridge.

So far as the neck angle is concerned, it doesn't matter how thick your bridge is. When all is said and done, you are going to want the top of the frets and the top of the bridge in the same plane.

What establishes the neck angle is the contact point between the heel of the neck and the sides of the guitar. The heel of the neck is how you control the neck angle. So, if the neck angle is shallow (high action with a low saddle) you will have to remove a wedged-shape piece of the heel. The thick end of the wedge would be removed at the heel-cap.

If the up and down angle is the "pitch" then the side to side angle would be the "yaw". The yaw has to be adjusted too or else one of the e-strings will be too close to the edge of the fretboard. You adjust the yaw by removing more material from one side of the heel (or "tenon shoulder") than the other.

The tools I use for cutting the heel are chisels and a paint stirring stick with self-adhesive sandpaper attached to it.

Check out my routine in photos 8-11 here:

http://fingerlakesguitarrepair.com/m...il-neck-reset/
Reply With Quote
  #20  
Old 12-08-2012, 08:37 AM
charles Tauber charles Tauber is offline
Registered User
 
Join Date: Feb 2011
Posts: 8,381
Default

Quote:
Originally Posted by nate clark View Post
Check out my routine in photos 8-11 here:
I love the "neck-set go-bars". Very clever.

If you change the angle of the neck, how do you deal with the portion of the fingerboard that glues to the top. If the neck is tilted backward to raise the string height at the bridge, and then the fingerboard glued to the top, the plane of the neck and the plane of the top aren't the same. Does the fingerboard just bend at the neck joint (i.e. 14th fret) as the transition from the plane of the neck to the plane of the top?
Reply With Quote
  #21  
Old 12-08-2012, 09:09 AM
nate clark nate clark is offline
Registered User
 
Join Date: Aug 2006
Posts: 142
Default

Quote:
Originally Posted by charles Tauber View Post
If you change the angle of the neck, how do you deal with the portion of the fingerboard that glues to the top.
That's a really good point/question. In most cases, I just glue and clamp that baby down to the top!

If there's a cutaway and the customer doesn't mind paying for additional labor, I'll make a little wedge to boost up the end of the fb. But the wedge probably won't be invisible and most guys don't notice or care or want to pay more so I don't do it very often.
Reply With Quote
  #22  
Old 12-08-2012, 10:38 AM
Ben-Had Ben-Had is offline
Registered User
 
Join Date: May 2010
Location: Creedmoor, NC
Posts: 524
Default

Quote:
Originally Posted by charles Tauber View Post
And this is the part you are not understanding. Where does the 89 or 88.7 come from?
I understand it very well. It comes from the existing angle on the neck one will be using to build the guitar. I could be wrong but I doubt the OP will be making his own neck, so it will come with an existing angle built in. Whatever that angle is 88, 88.5, 88.7, 89, doesn't matter. It should be matched up with the body to get 180 for good action. If done right, the manufacturer should have matched up the correct top radius (25', 28', 40' are very common) to get the proper slope/height up to the bridge. If one starts off with an existing angle of 88.7 and builds the body with a 90 there can be problems and that is what many new builders do when assembling the first time. They get these angles off and don't understand why things don't match up.

While Nate doesn't say it (and I'm sure he knows this) when he resets that neck he is matching up the required angle to get the plane back to 180. That's why a wedge is most often needed under he fretboard. By shaving the heel the neck angle has changed but the body angle hasn't. Adding a wedge changes the body angle and gets the two surfaces back to a complimentary 180. And that is especially true in his example of a Martin guitar.
__________________
Tim B
Reply With Quote
  #23  
Old 12-08-2012, 11:31 AM
charles Tauber charles Tauber is offline
Registered User
 
Join Date: Feb 2011
Posts: 8,381
Default

Quote:
Originally Posted by Ben-Had View Post
If done right, the manufacturer should have matched up the correct top radius (25', 28', 40' are very common) to get the proper slope/height up to the bridge.
Please correct me if I'm wrong, since I don't use this approach, but that isn't historically how the the 180 degrees is/was accomplished. It pre-dates the use of spherical dishes and had a flat upper bout.

If one uses a spherical dish to have the radius you mention, how does one glue a flat plane (underside of a fingerboard) to a spherical surface and not have gaps?

Quote:
While Nate doesn't say it (and I'm sure he knows this) when he resets that neck he is matching up the required angle to get the plane back to 180.
He said, "In most cases, I just glue and clamp that baby down to the top!" You can interpret that as you wish.
Reply With Quote
  #24  
Old 12-08-2012, 01:00 PM
Ben-Had Ben-Had is offline
Registered User
 
Join Date: May 2010
Location: Creedmoor, NC
Posts: 524
Default

Quote:
Originally Posted by charles Tauber View Post
Please correct me if I'm wrong, since I don't use this approach, but that isn't historically how the the 180 degrees is/was accomplished. It pre-dates the use of spherical dishes and had a flat upper bout.

If one uses a spherical dish to have the radius you mention, how does one glue a flat plane (underside of a fingerboard) to a spherical surface and not have gaps?
The rim top and top kerfing are sanded dead flat, the radius is machined (contoured) into the X braces (some radius the outer edges of the transverse brace as well, I don't) effectively lifting the topfrom the edges to its peak near the bridge area. Then the complimentary angle is sanded (flat) into upper bout from the front of the sound hole to the neck block. The combination of the neck angle, top angle and radius lift, bridge thickness will bring the plane exactly where it needs to be is (of course assuming one has insured keeping to the tight tolerances). This keeps the upper bout flat and gives the proper angle to get good action.
__________________
Tim B
Reply With Quote
  #25  
Old 12-08-2012, 01:20 PM
murrmac123 murrmac123 is offline
Registered User
 
Join Date: Dec 2008
Location: Edinburgh, bonny Scotland
Posts: 5,197
Default

Quote:
Originally Posted by Ben-Had View Post
The rim top and top kerfing are sanded dead flat.
The whole point of a radiused sanding dish is to give as perfect a glue joint as possible.

If you sand the rim and kerfed lining dead flat, (as opposed to sanding a spherical contour with a radiused sanding dish) then , if your top is radiused, you will have a very dodgy glue joint in the waist area.
Reply With Quote
  #26  
Old 12-08-2012, 01:51 PM
Ben-Had Ben-Had is offline
Registered User
 
Join Date: May 2010
Location: Creedmoor, NC
Posts: 524
Default

Quote:
Originally Posted by murrmac123 View Post
The whole point of a radiused sanding dish is to give as perfect a glue joint as possible.

If you sand the rim and kerfed lining dead flat, (as opposed to sanding a spherical contour with a radiused sanding dish) then , if your top is radiused, you will have a very dodgy glue joint in the waist area.
No you won't. That's exactly how the Martin factory does theirs. There is not enough slope at the edge to be a problem. In fact, I make guitars with no binding and the top/back/rim joints come out perfect.

Edit: not sure if you can see the detail here.

__________________
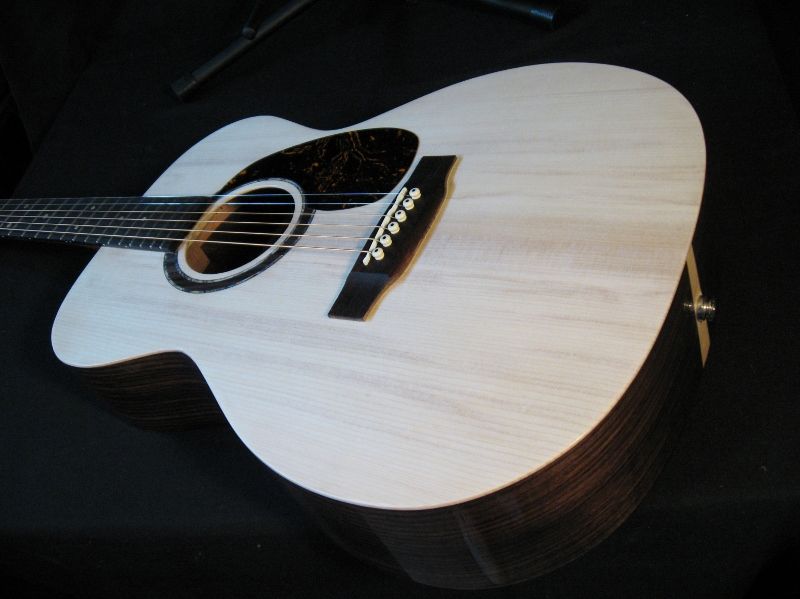
Tim B

Last edited by Ben-Had; 12-08-2012 at 01:57 PM.
Reply With Quote
  #27  
Old 12-08-2012, 05:23 PM
murrmac123 murrmac123 is offline
Registered User
 
Join Date: Dec 2008
Location: Edinburgh, bonny Scotland
Posts: 5,197
Default

OK, I see where you are coming from ...Bill Cumpiano adopted a similar approach in his seminal work on guitarmaking IIRC.

Just out of interest, if you did install binding, would you be totally certain that the glue joint between the kerfed lining and the top would be strong enough to handle the rebates for purfling/binding ?
Reply With Quote
  #28  
Old 12-08-2012, 05:44 PM
Ben-Had Ben-Had is offline
Registered User
 
Join Date: May 2010
Location: Creedmoor, NC
Posts: 524
Default

Quote:
Originally Posted by murrmac123 View Post
OK, I see where you are coming from ...Bill Cumpiano adopted a similar approach in his seminal work on guitarmaking IIRC.

Just out of interest, if you did install binding, would you be totally certain that the glue joint between the kerfed lining and the top would be strong enough to handle the rebates for purfling/binding ?
Yes, it is. I use the same method when I install binding and purfling.

Edit: this is the sister guitar to the one above. It's in the spray booth now. Maple binding and B/W/B purfling.
__________________
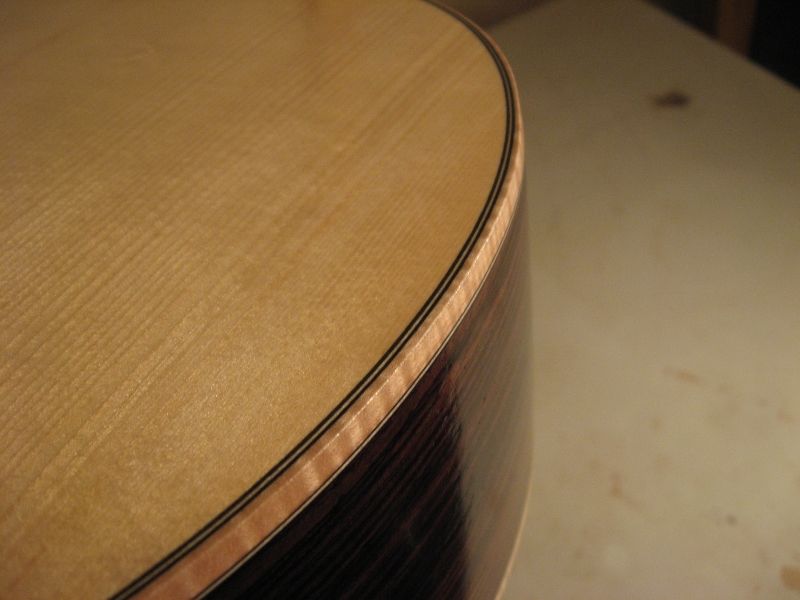
Tim B

Last edited by Ben-Had; 12-08-2012 at 07:12 PM.
Reply With Quote
  #29  
Old 12-08-2012, 07:56 PM
Glen DeRusha Glen DeRusha is offline
Registered User
 
Join Date: Sep 2007
Posts: 271
Default

[QUOTE=charles Tauber;3270447]

If one uses a spherical dish to have the radius you mention, how does one glue a flat plane (underside of a fingerboard) to a spherical surface and not have gaps?

QUOTE]

Radius the - (underside of a fingerboard) -, fingerboard extension, to match the - spherical surface -, of the top. Chalk, sharp chisel, little scraper, etc. Same way we do the tone bars on a mandolin. The last time I checked, it was still legal to do that. Don't know if anything has changed since then. Then you don't have to do all that grinding on the top.

Glen
Reply With Quote
  #30  
Old 12-08-2012, 11:04 PM
charles Tauber charles Tauber is offline
Registered User
 
Join Date: Feb 2011
Posts: 8,381
Default

Quote:
Originally Posted by Glen DeRusha View Post
Radius the - (underside of a fingerboard) -, fingerboard extension, to match the - spherical surface -, of the top.
That'd work.
Reply With Quote
Reply

  The Acoustic Guitar Forum > General Acoustic Guitar and Amplification Discussion > Build and Repair


All times are GMT -6. The time now is 06:17 AM.


Powered by vBulletin® Version 3.8.11
Copyright ©2000 - 2024, vBulletin Solutions Inc.
Copyright ©2000 - 2022, The Acoustic Guitar Forum
vB Ad Management by =RedTyger=