The Acoustic Guitar Forum

Go Back   The Acoustic Guitar Forum > General Acoustic Guitar and Amplification Discussion > Build and Repair

Reply
 
Thread Tools
  #16  
Old 07-21-2013, 06:47 PM
Ned Milburn Ned Milburn is offline
Registered User
 
Join Date: Feb 2011
Location: Dartmouth, NS
Posts: 3,127
Default

Quote:
Originally Posted by stuw View Post
Ned I like your simple design a lot, any more detailed pics?
I'll try to remember to take a couple more pics tomorrow and post a link. If I don't get them posted, kindly PM me to remind me. (Tired after a full day of taking my kids for bicycle rides and helping my older child learn to ride without training wheels. Today, he got it and had a blast, and now his favorite thing is skidding!)
__________________
----

Ned Milburn
NSDCC Master Artisan
Dartmouth, Nova Scotia
Reply With Quote
  #17  
Old 07-22-2013, 01:46 PM
LouieAtienza LouieAtienza is offline
Registered User
 
Join Date: Feb 2013
Posts: 4,617
Default

Quote:
Originally Posted by stuw View Post
Thanks for all the help and info everyone.
I need to sit down and figure out which one I'm going to build.
I did get my binding channel cut buy using my dremel with a piece of .04 plastic taped to the base. Had to make several passes but it actual worked fairly well, and like Bob said, I had to "fine tune" it with a chisel but all is well. Charles is right, there just is not enough power in a dremel to do this kind of work.


I do own a roto zip it has a 1/8" shank, what bits do you use King?
Ned I like your simple design a lot, any more detailed pics?
Aire, I looked at the LMII video on the set up and use of the Gramil, looks like a lot of work, but it does interest me.
Louie, I looked at several websites and videos of the Flieshman/Williams jig. Alan Caruth modified his to be wall mounted which is what I may have to do with my limited space.

Once again thank you all for your help
Stu
I like Alan's design because each axis has independent guides, which gives it some ridgidity. I had adopted a design based on Fleishman's...

Also there's a YouTube video with Jose Romanillos doing this entirely with hand tools. He makes it look so easy!
Reply With Quote
  #18  
Old 07-22-2013, 08:28 PM
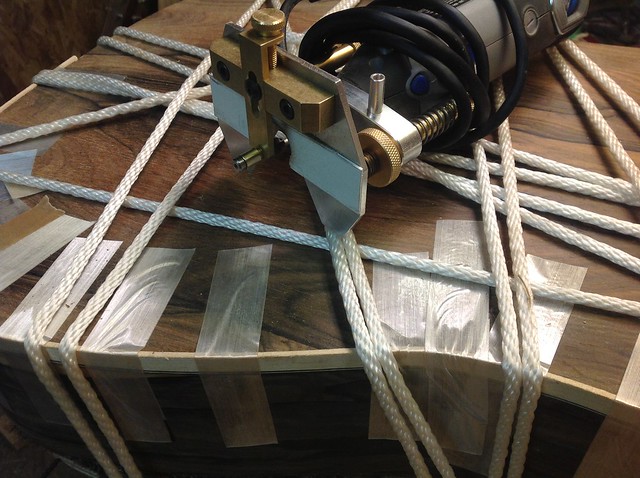
Ned Milburn Ned Milburn is offline
Registered User
 
Join Date: Feb 2011
Location: Dartmouth, NS
Posts: 3,127
Default

Hey Stu,

I tried to post some more detailed pics but for some reason it wasn't working. If you PM (private message) your email address to me, I can send you some.

Cheers.
__________________
----

Ned Milburn
NSDCC Master Artisan
Dartmouth, Nova Scotia
Reply With Quote
  #19  
Old 07-22-2013, 09:05 PM
Viking Viking is offline
Registered User
 
Join Date: Mar 2013
Location: Colorado Springs, CO
Posts: 234
Default

Quote:
Originally Posted by charles Tauber View Post
I don't understand the above two statements.

In a Stewmac type arrangement, the carriage to which the router is attached moves vertically up and down. This allows it to follow the vertical change related to the curved/domed top or back. The constraint on the carriage keeps the router vertical at all times. With the guitar setup in its own "carriage" so that the sides are vertical, the channels cut are then constrained to be perpendicular to the sides. I'm not understanding how that is accomplished in your arrangement.

My suggestion is make one of these:

http://www.canadianluthiersupply.com...ts/binding-jig

This is the method I'm planning on using when I get to routing the binding channel. Has anyone used both? The stationary jig where one moves the guitar, or the stationary guitar where one moves the jig(like the one King Cavalier posted)? Which one do you prefer?
__________________
-- Nick
Reply With Quote
  #20  
Old 07-23-2013, 07:16 PM
KevinLPederson KevinLPederson is offline
Registered User
 
Join Date: Jan 2012
Posts: 827
Default

I just made this little "foot" to allow the edge of the guitar to ride on. Its like doing the job upside down. It actually works really well, is simple in set up and saves me a lot of room. You just have to get good at holding the guitar "square". Which isn't as hard as it might seem. This seems simple enough and, for me, works great!


and this picture is of the 12' radius back...


This works great. I also can take off the little "ledge" foot and just plop the headstock face down flat prior to the fingerboard being glued on for the headstock binding.

When I'm done, I just take all this up off the table and I can go back to using it as a router table.

Peace.

Kevin.
Reply With Quote
  #21  
Old 07-25-2013, 08:29 AM
stuw stuw is offline
Registered User
 
Join Date: Feb 2013
Posts: 228
Default

Kevin,
Thanks for showing me your method but I don't think I'm steady enough to try that. My binding channel would end up looking like the Grand Canyon.

Stu

I think I'm going to try build a set up like Ned use's. Cheap to build and if I don't like it I'll build one of the others..
__________________
I'm not a luthier...luthier's know what they are doing.
Reply With Quote
Reply

  The Acoustic Guitar Forum > General Acoustic Guitar and Amplification Discussion > Build and Repair


All times are GMT -6. The time now is 11:29 PM.


Powered by vBulletin® Version 3.8.11
Copyright ©2000 - 2024, vBulletin Solutions Inc.
Copyright ©2000 - 2022, The Acoustic Guitar Forum
vB Ad Management by =RedTyger=